Integration Manager Workflow
Original Author: Sumon C, May 27, 2021
Introduction
Below is the software development workflow adopted by REDCap@Yale, written and explained from the perspective of the integration manager maintaining a software project being developed by the team. You should have some understanding of version control using Git before proceeding. The following was designed to implement a distributed version control scheme while avoiding unnecessary administrative overhead.
Overview
REDCap@Yale follows a distributed development workflow where there exists:
- A central "official" remote repository, from which releases and deployments to production REDCap instances are created,
- An individual developer's remote repository, from which pull requests to the official remote repository are created, and
- An individual developer's local repository, where the developer commits their changes to the codebase.
This is either referred to as the Integration-Manager Workflow or the Forking Workflow, depending on the resources consulted.
Definitions
The following definitions are used in this guide to clarify our process.
- Developer: a person contributing to the software development of the REDCap@Yale external module or other digital tools through feature development, bug fixes, and testing. A person in this role can contribute to a project, but the integration manager must review the submitted code before the changes can be incorporated.
- Integration manager: a person maintaining an external module or digital tool development project by code-reviewing changes submitted by contributing team developers and incorporating these changes into the project. Generally, the integration manager is the owner of the project, but does not have to be.
- Central repository: the central "official" remote repository which resides in the REDCap@Yale organization GitHub account. This repository contains all of the work that has been vetted and tested. Production releases and deployments to our REDCap servers will be done from the codebase that resides in this repository.
- Remote repository: the developer's remote repository which resides in the developer's personal and/or Yale GitHub account. This repository contains, ideally, all of the work that exists in the central repository, as well as the modifications that the developer has made to the project.
- Local repository: the local repository that exists in the filesystem of the developer's local machine. This repository contains, ideally, all of the work that exists in the central repository, as well as both tested and untested modifications that the developer is making and testing on their machine.
- Fork: the process where the central repository is copied over to a developer's personal GitHub account, creating the remote repository.
- Clone: the process where the remote repository is copied over to the filesystem of the developer's local machine, creating the local repository.
- Push: the process where code in the local repository is uploaded, through Git, to the developer's remote repository.
- Pull: the process where code in either the central or remote repository is downloaded, through Git, to the developer's local repository.
- Pull Request: a request filed by the developer to have the developer's changes, housed in the remote repository, added to the codebase in the central repository, through GitHub. Once a request is filed, the integration manager reviews the request, performs more tests if necessary, and pulls the changes from the remote repository to the central repository.
Process Summary
The summarized process is:
The integration manager creates and/or pushes code to the central repository.
A contributing developer forks the central repository, creating their remote repository.
The developer clones the remote repository to their local machine, creating their local repository.
The developer makes changes within the local repository.
The developer pushes these changes to the remote repository.
The developer submits a pull request in the GitHub web interface, notifying the integration manager.
The integration manager either:
adds the developer’s remote repository as a remote and merges locally, or
merges the changes directly on the GitHub web interface.
The developer then pulls from the central repository to the local repository, ensuring their copy is up to date.
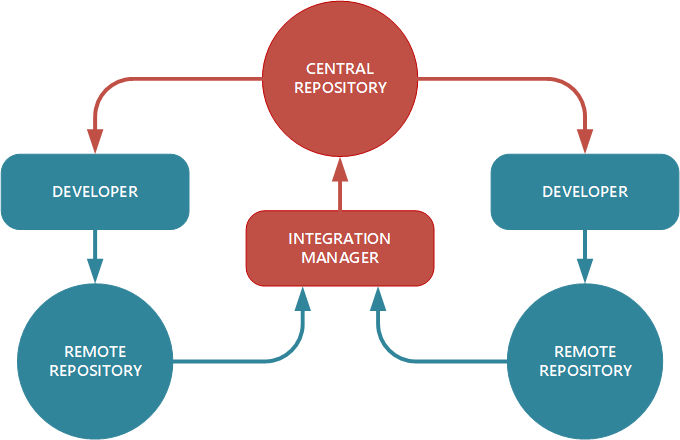
The figure above is the diagram located in the Git web-book, illustrating the general process.
One of the main advantages of this approach is that the developer can continue to work, and the integration manager of the central repository can pull in the developer's changes at any time. Developers do not have to wait for the project to incorporate their changes — each party can work at their own pace.
Detailed Integration Manager Workflow Process
Described below in detail is the REDCap@Yale software development workflow that you, as the integration manager, should be following when maintaining REDCap external modules and other digital tools used by the REDCap@Yale team. In the screenshots and code snippets below, test-repo or test-repo.git should be replaced with the actual project repository name or address.
In this workflow, we are treating the master branch of the central repository as the "bleeding edge" version of the software, where all bug fixes, new features, and enhancements will be centrally incorporated. Various releases and versions will be created by branching off of this master branch.
1. Create the central repository
Anyone who has access to the REDCap@Yale organization GitHub account may create the central repository. In most projects, the integration manager will create the central repository in the GitHub web interface, clicking the button shown below.

Once the repository is created, code can be added to the central repository by following the commands shown by GitHub.
Create the repository in a local machine via the command line:
echo "# test-repo" >> README.md
git init
git add README.md
git commit -m "first commit"
git remote add origin https://github.com/yale-redcap/test-repo.git
git push -u origin master
If the repository already exists on a local machine, push the existing repository:
git remote add origin https://github.com/yale-redcap/test-repo.git
git push -u origin master
2-6. Developers fork the central repository, push some changes, and create pull requests
Once created, multiple developers can fork the central repository to create their own remote repositories, in which they can push local changes. The developers, once satisfied with the changes and thoroughly tested, will create pull requests so that the central repository can incorporate these changes.
For further details, refer to the workflow guide for the developer.
7. Review and merge the pull request
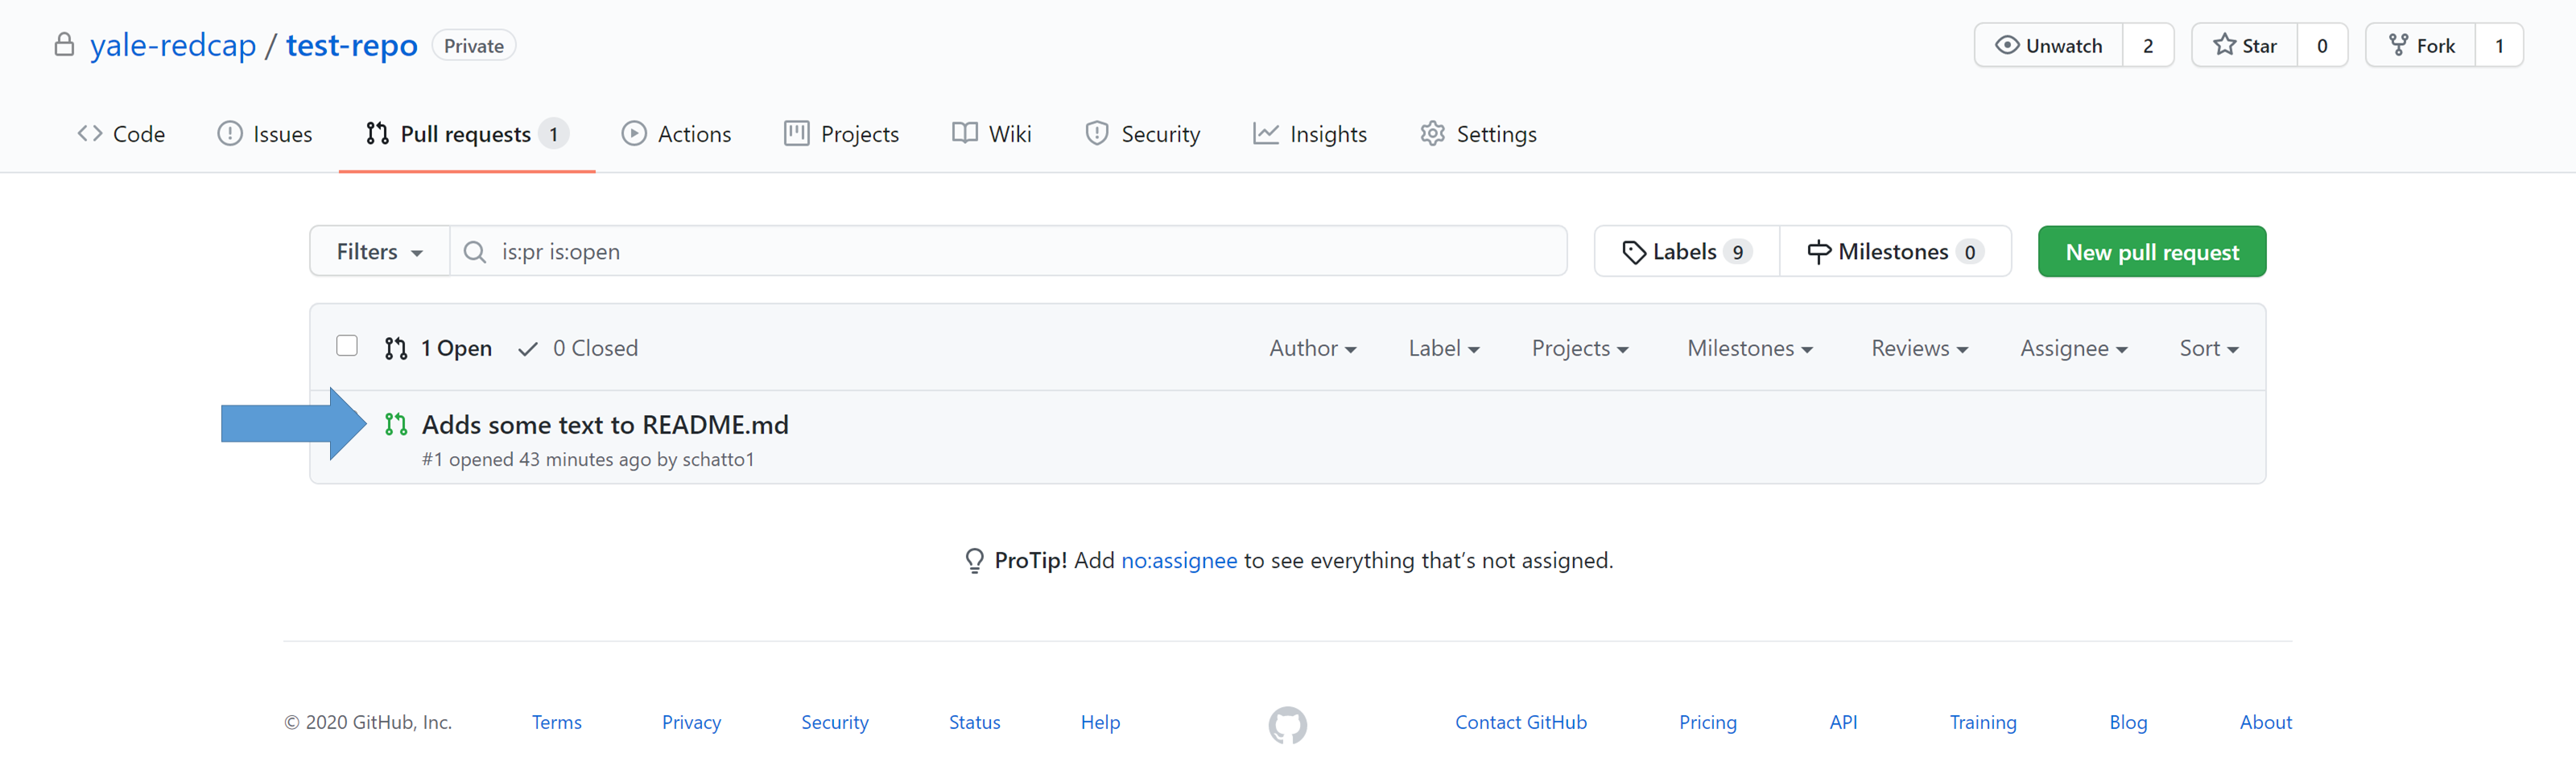
Once a developer creates a pull request, you will be notified by email from GitHub that there is a new pull request in your project. The developer may also personally let you know about their pull request.
Review and merge directly in GitHub web interface
In most cases, you will be able to merge the pull request into the central repository directly in the GitHub web interface.
Select the pull request you want to review:
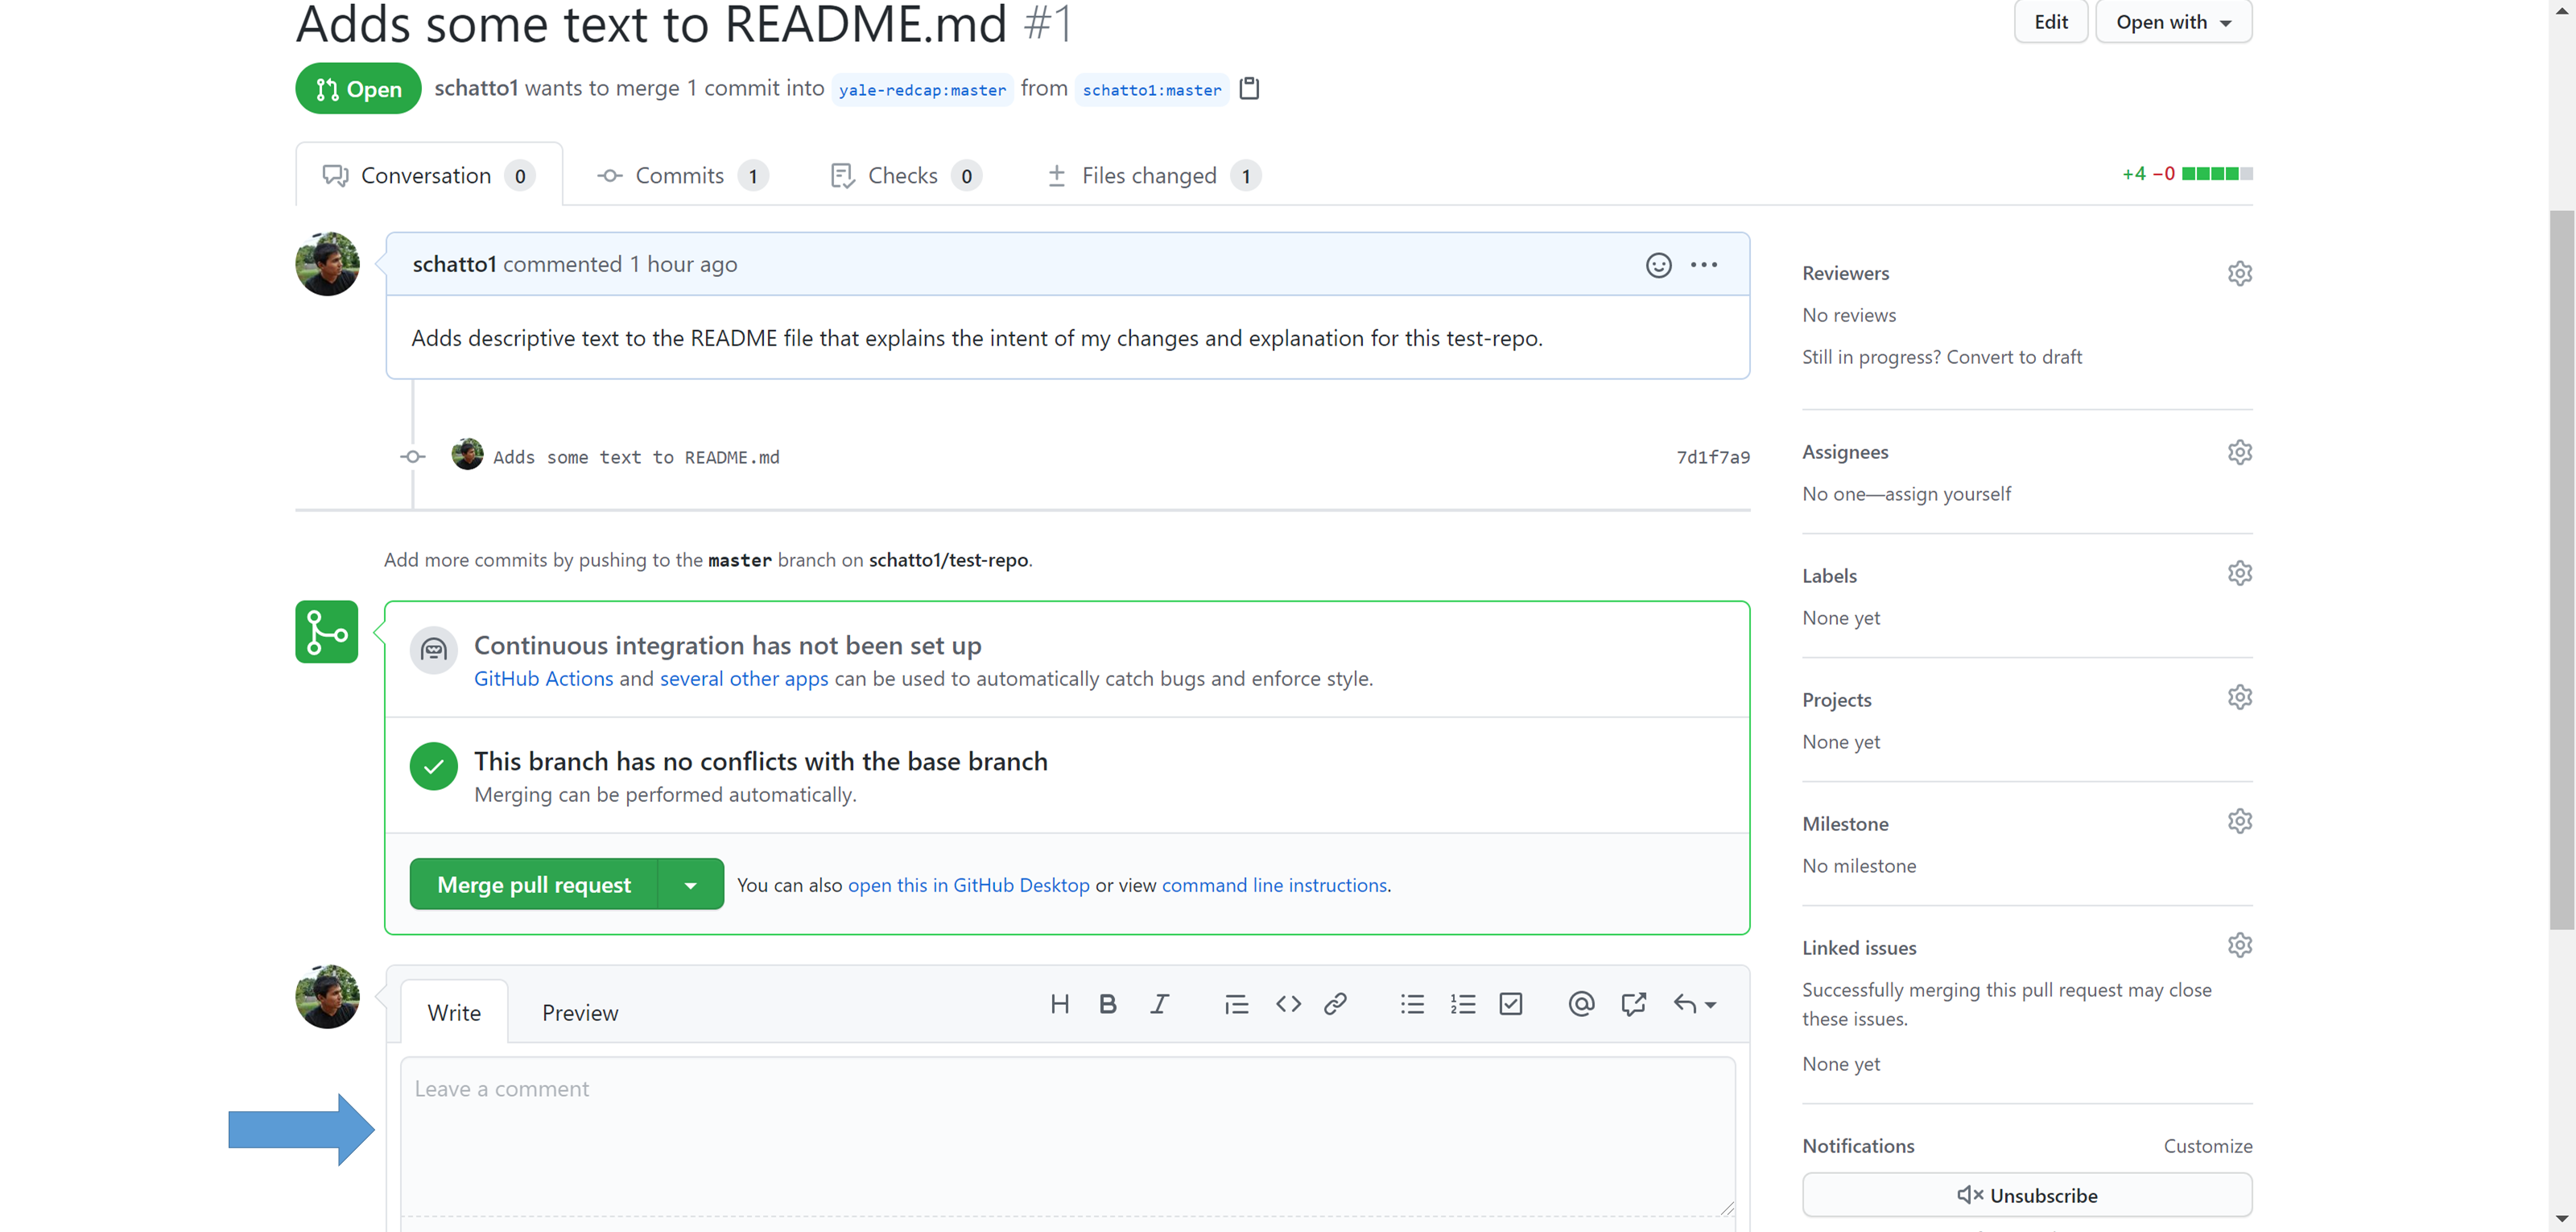
Once in this window, you can add questions or comments to the pull request if you need something clarified publicly:
Click on the "Files changed" tab to see the changes that the developer made:
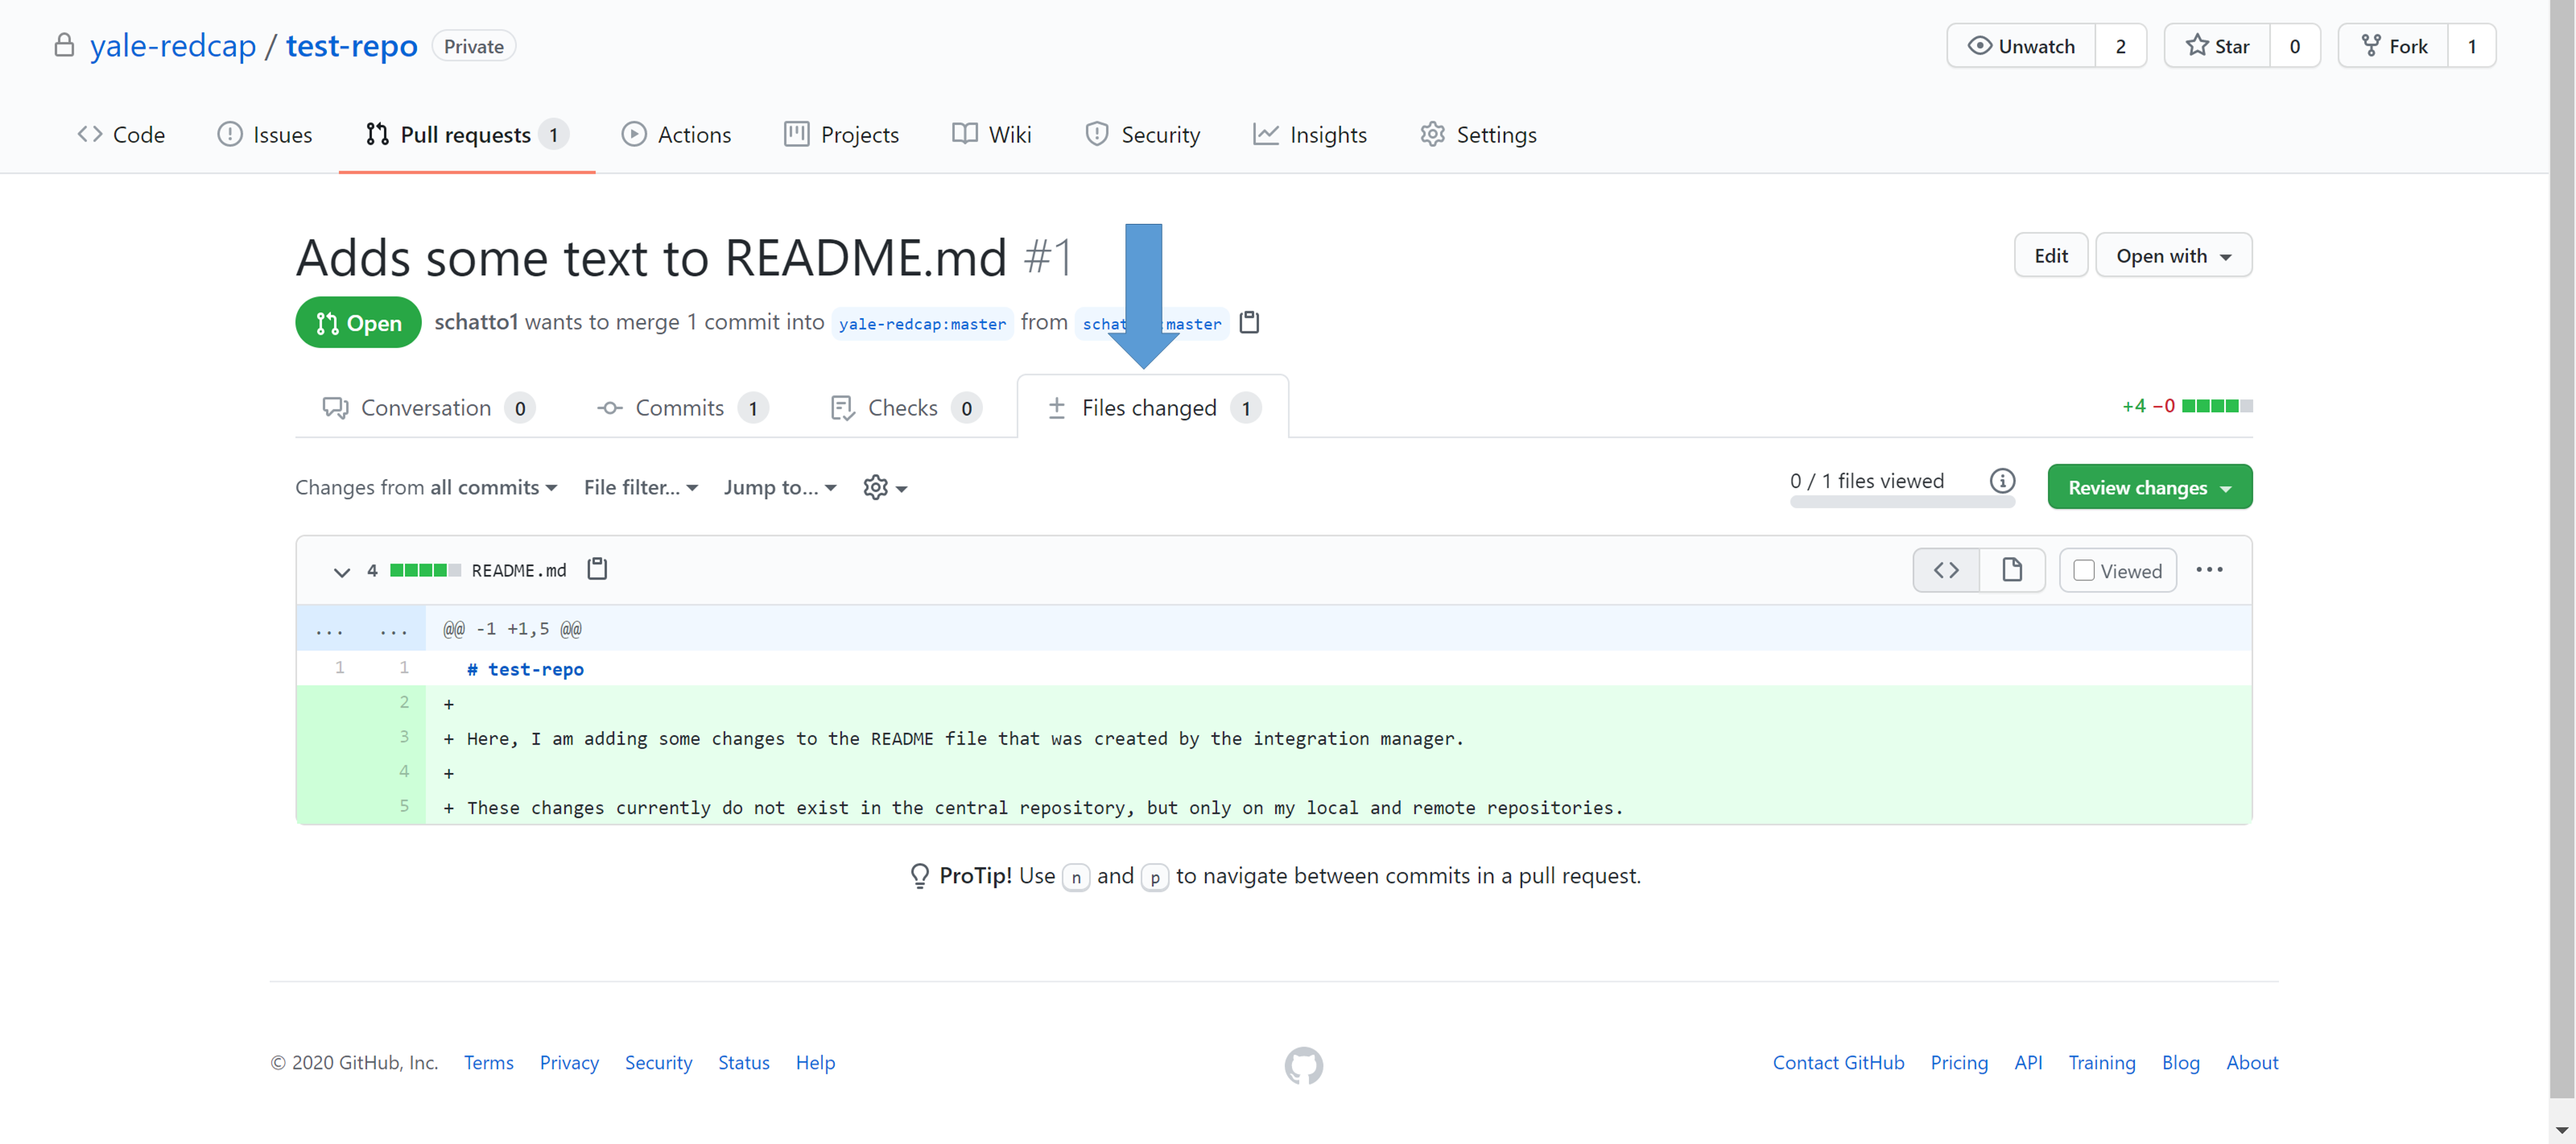
From this webpage, you will also be able to write comments, approve the changes, or request further changes, depending on the pull request:
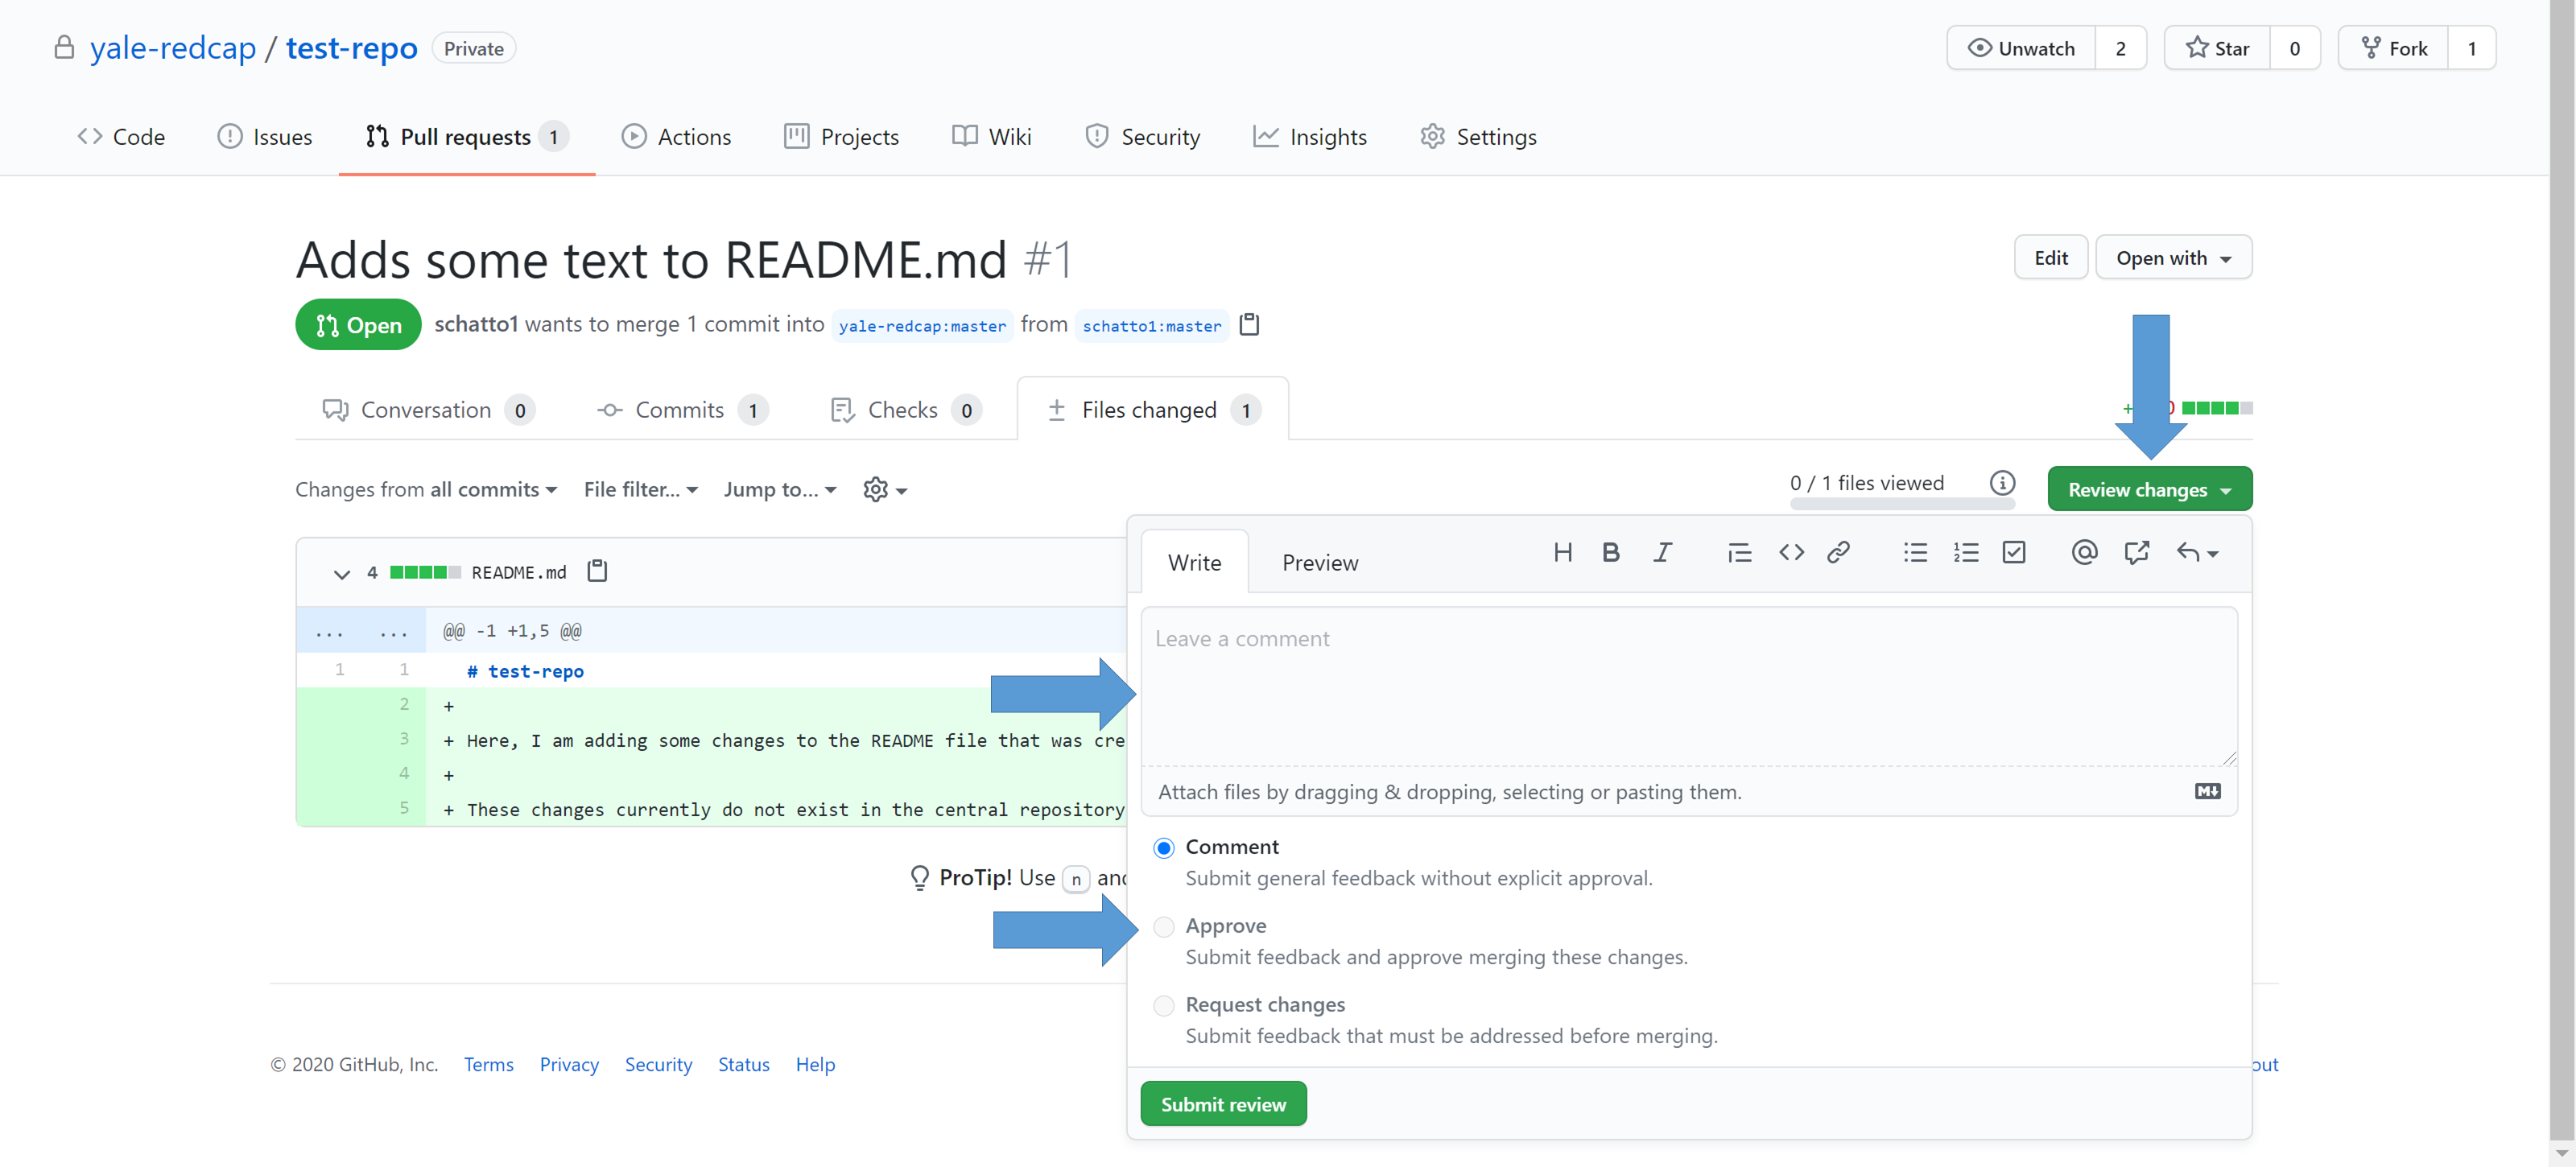
This will also be a good time to make sure that the developer is following the development standards and conventions to ensure other developers can easily understand the codebase.
Once sufficiently reviewed, click the "Merge pull request" button:
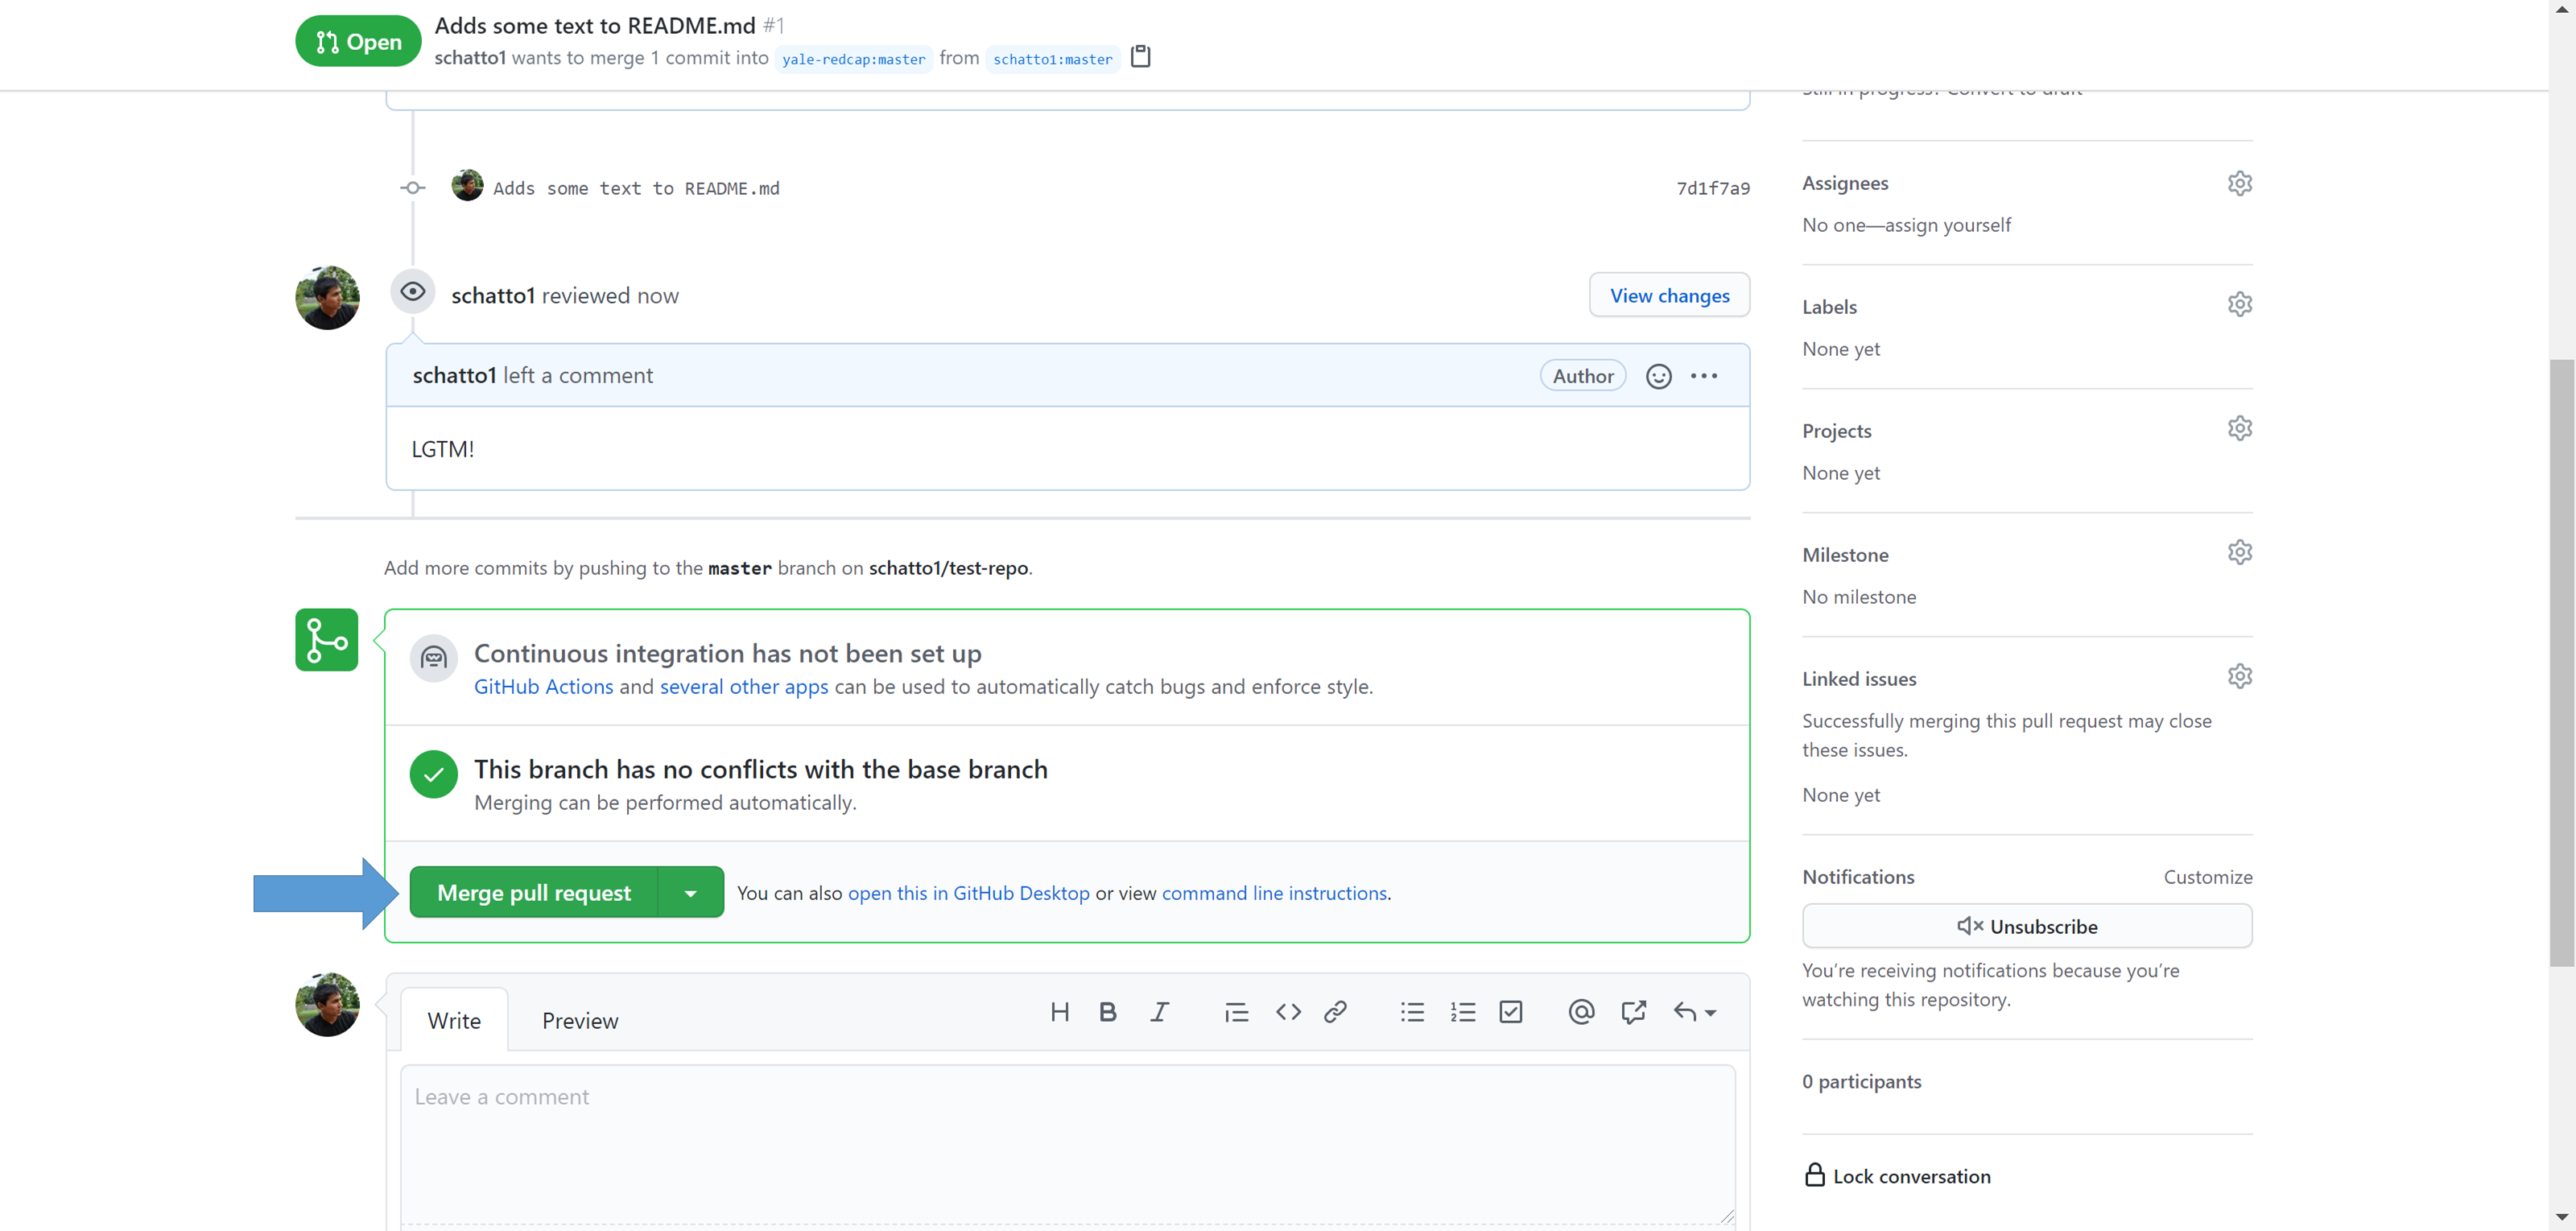
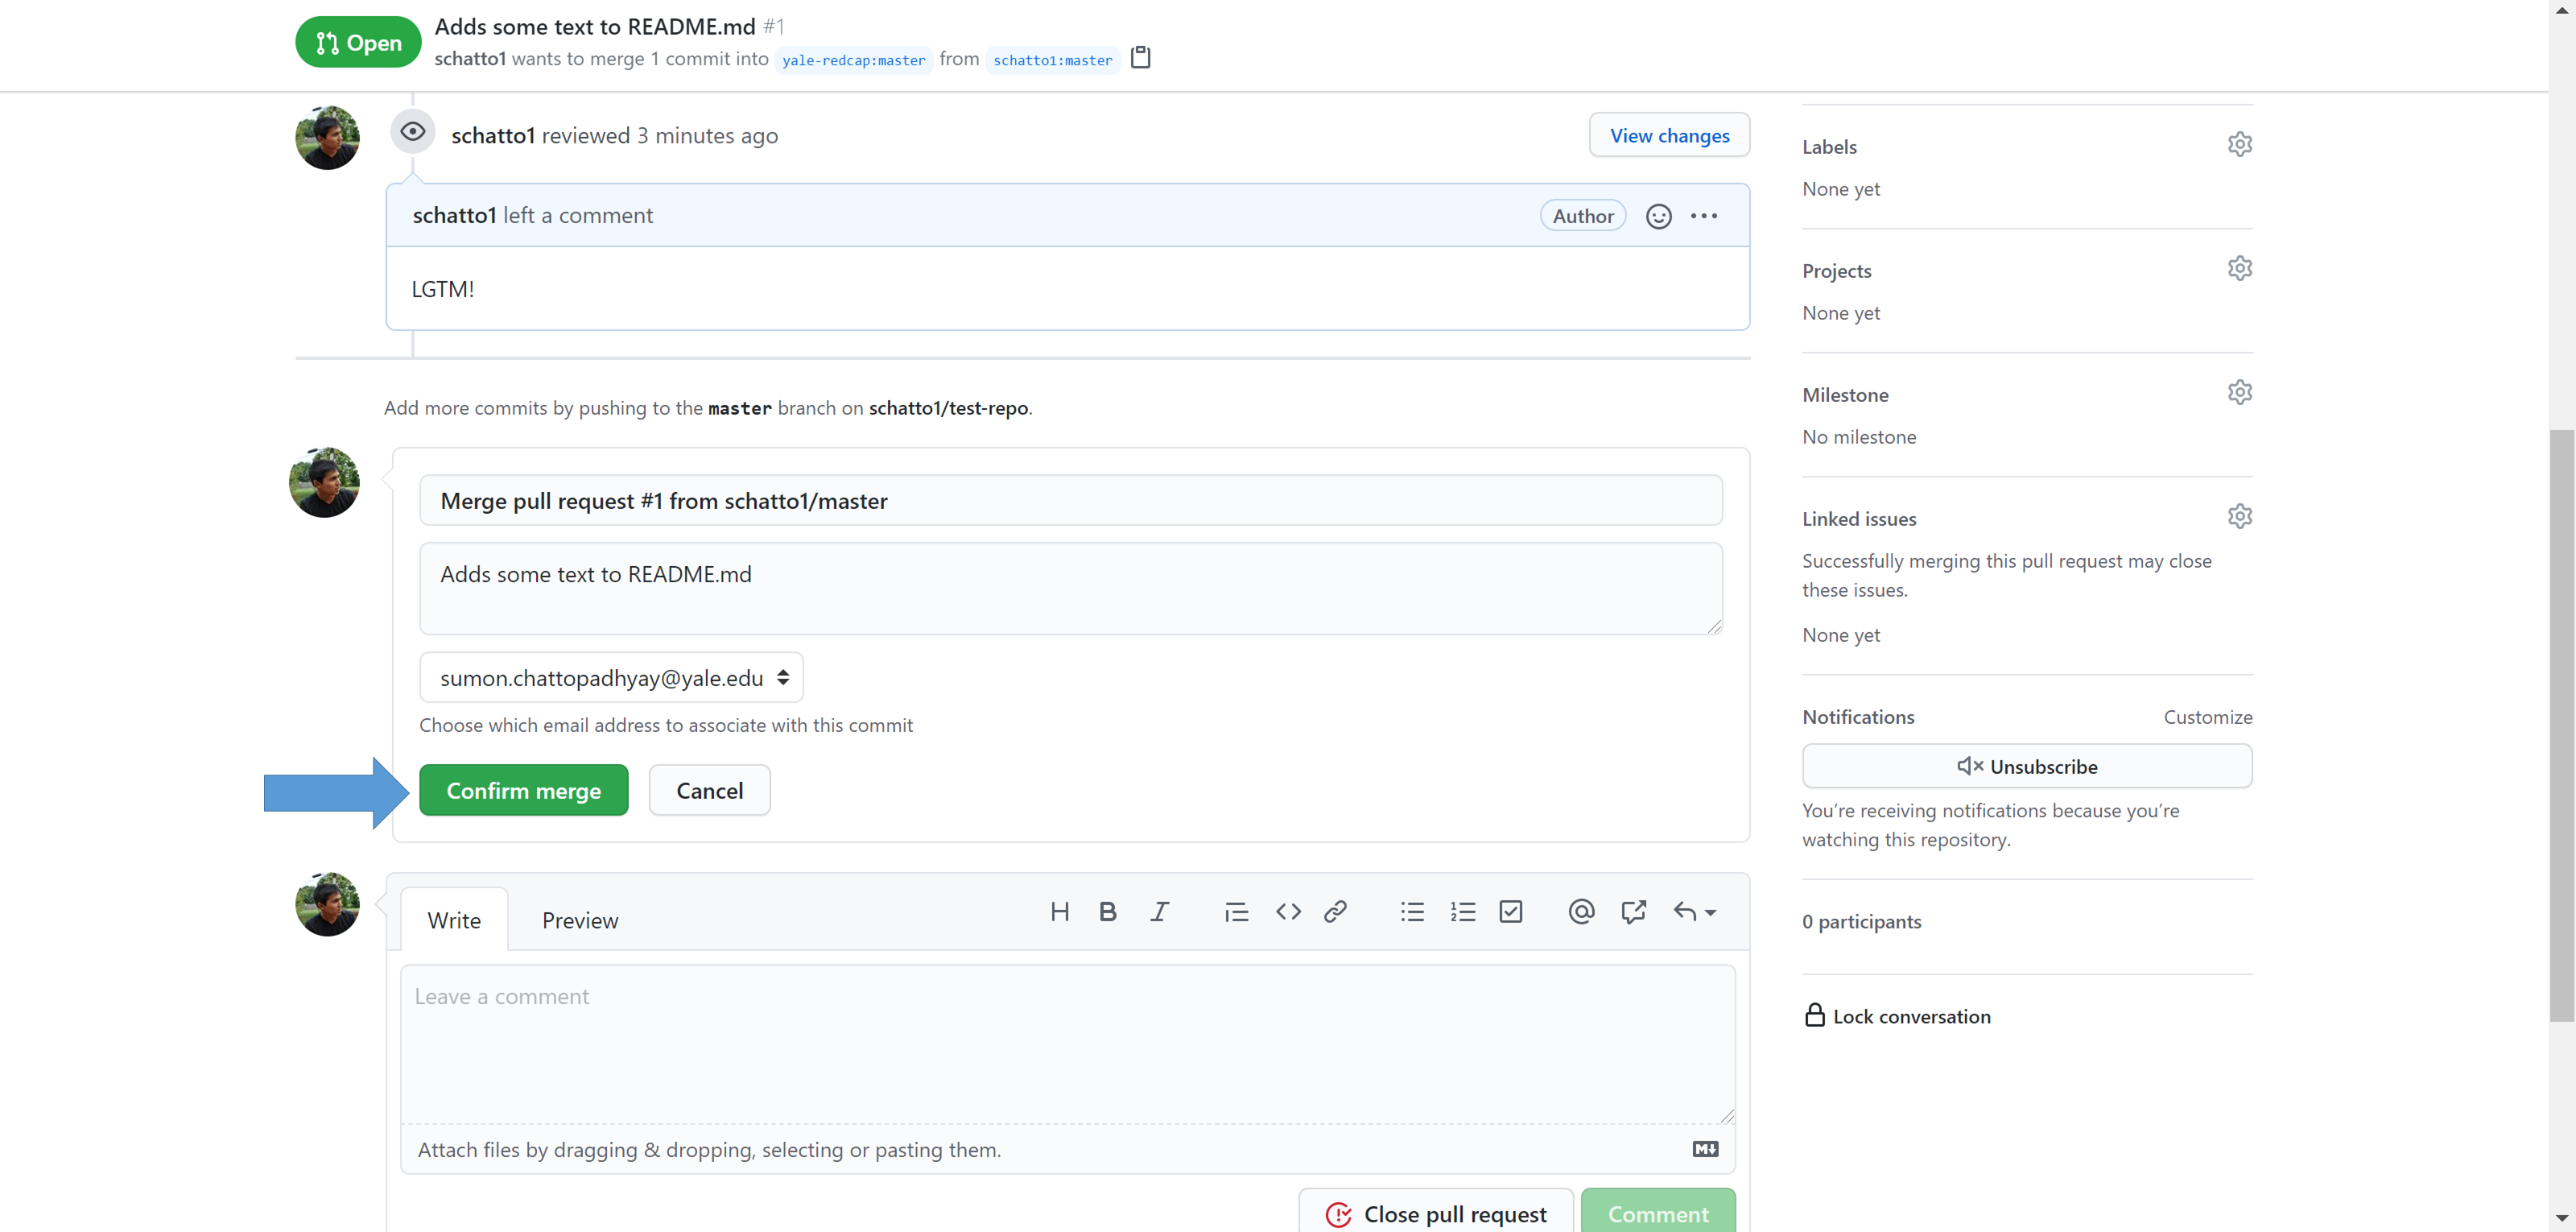
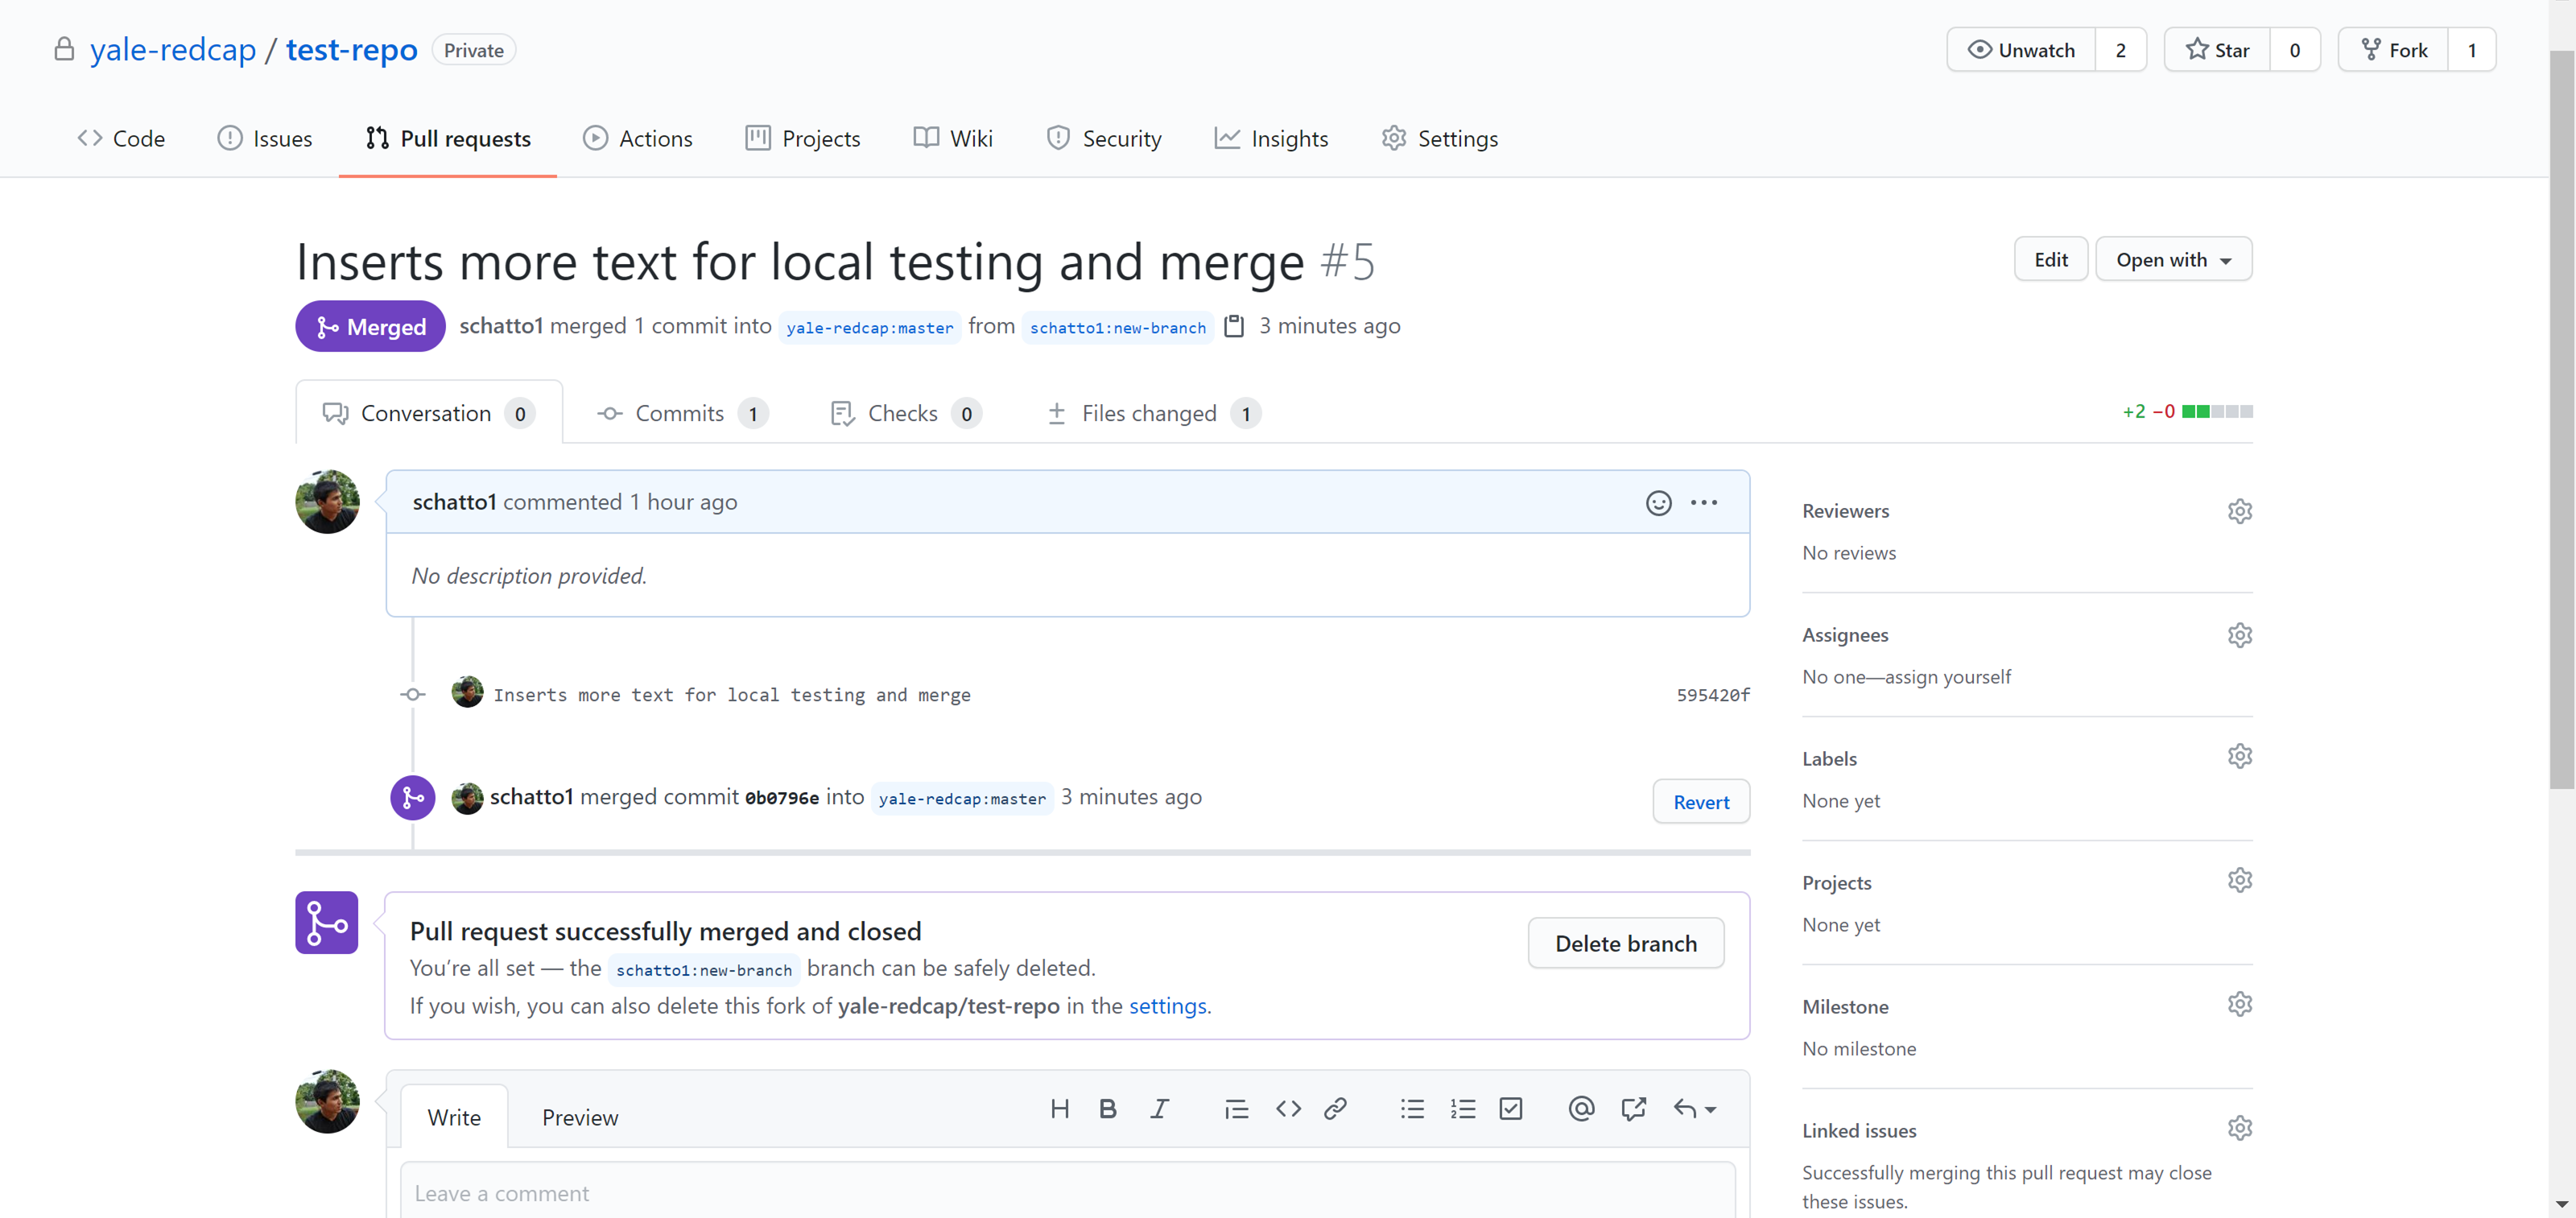
Select "Confirm merge" to finalize the merge into the central repository.
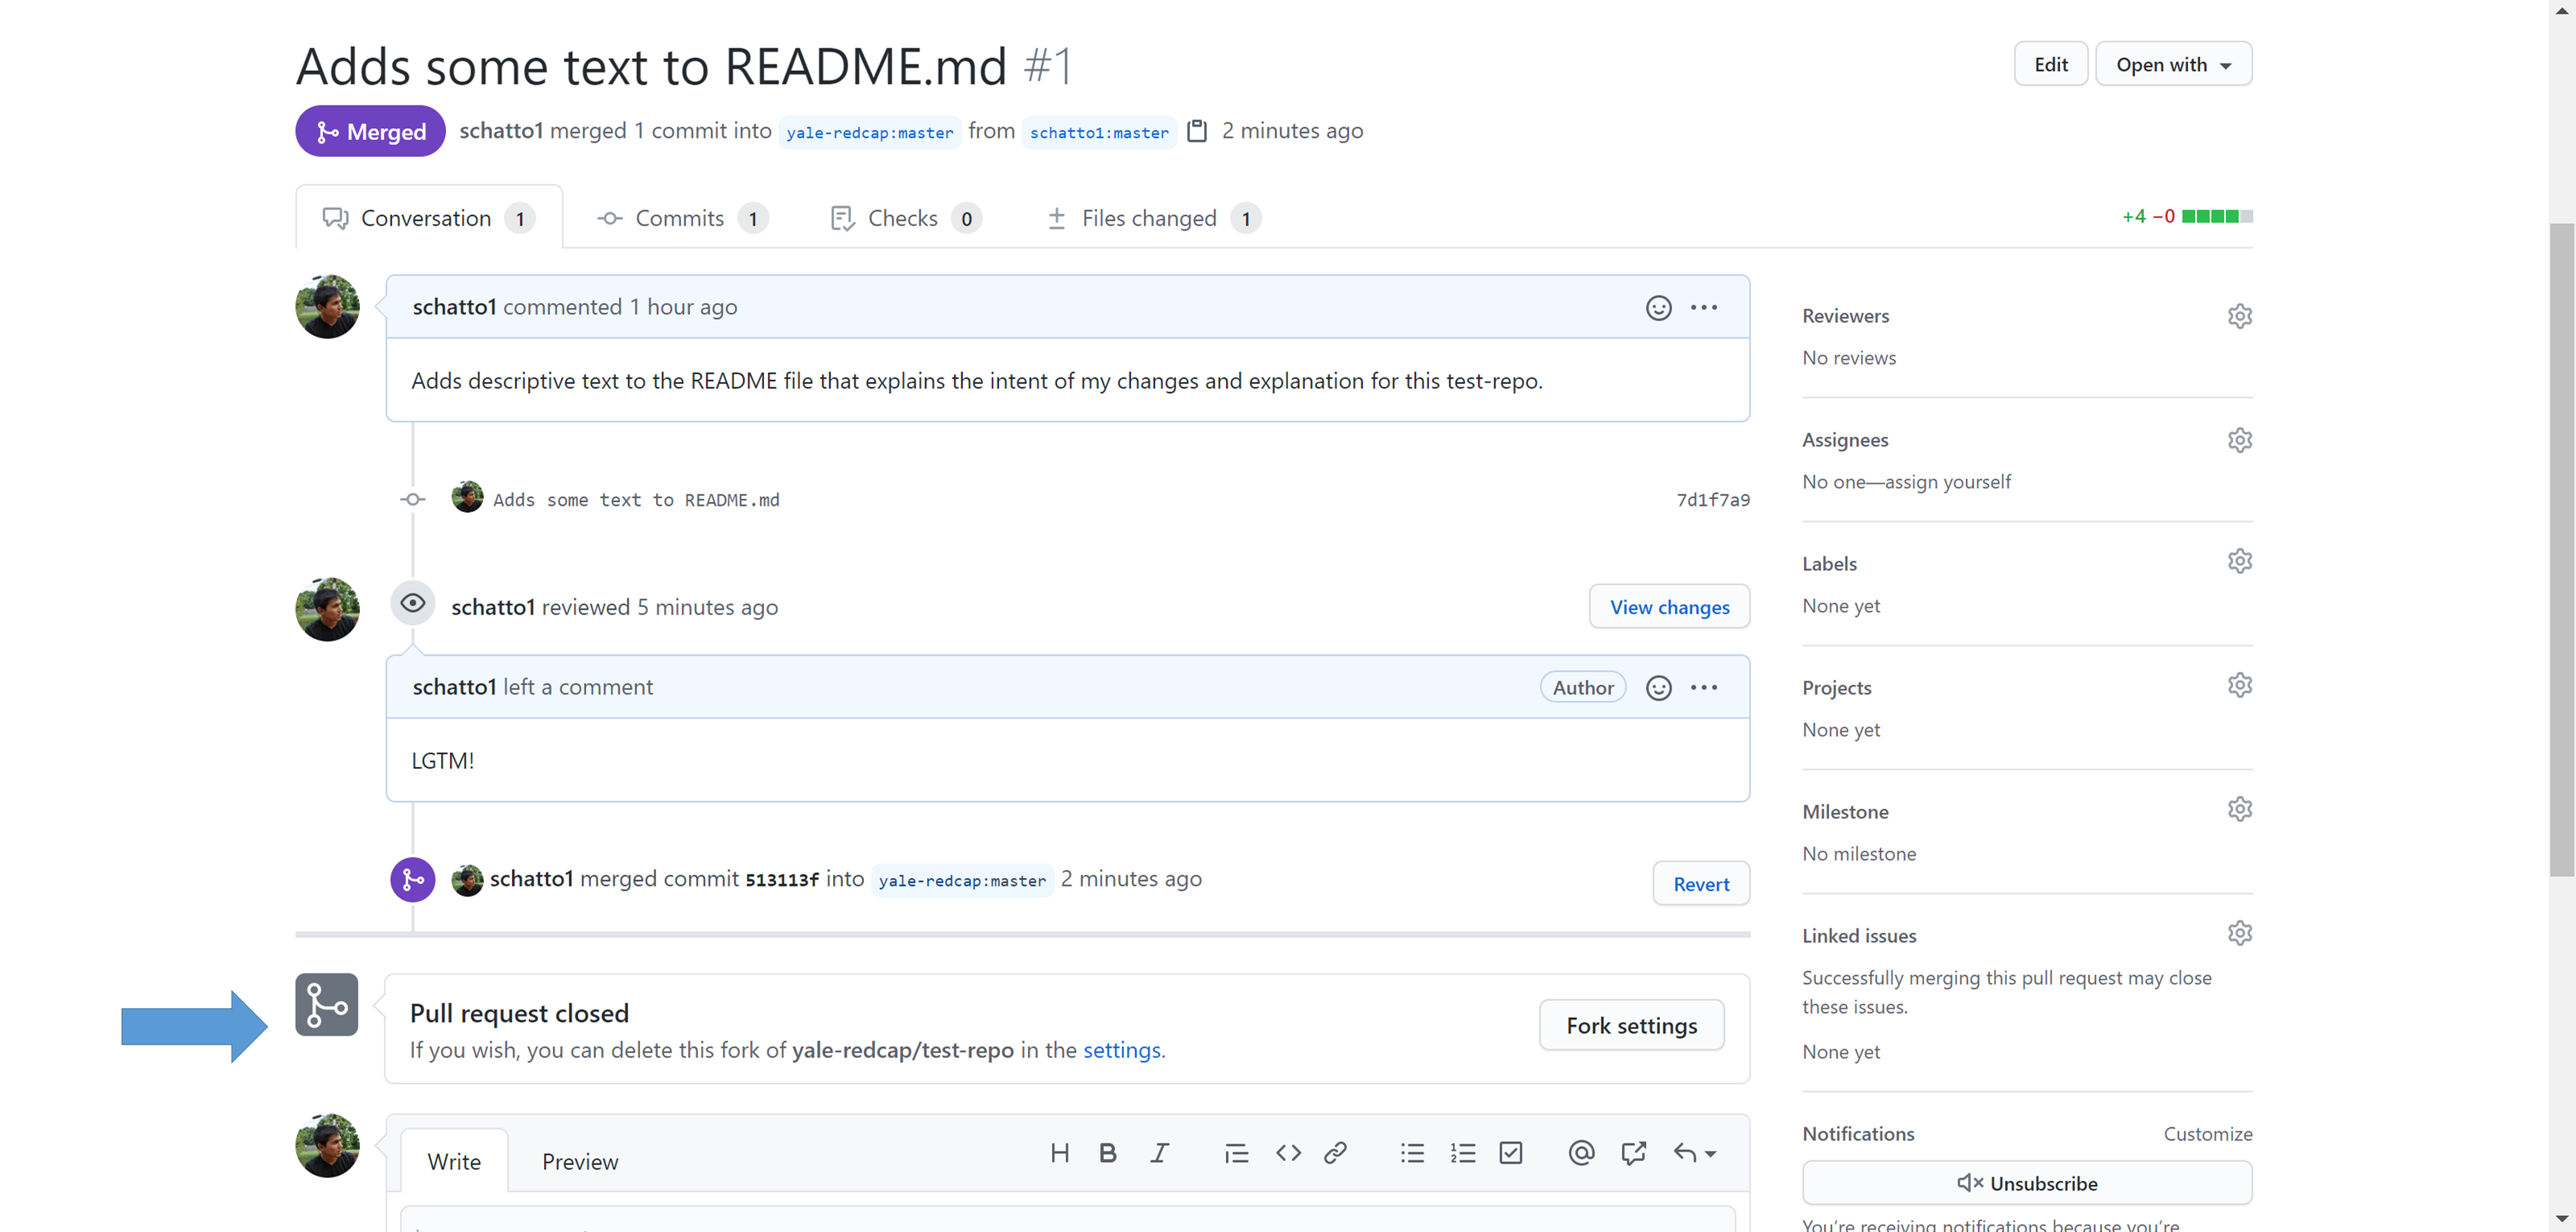
Once successfully merged, the pull request is automatically closed.
Review and merge on the local machine
In some cases, it may be necessary to review the changes on your local machine before approving the pull request and merging the changes into the central repository. This may be the case when further testing is required, or if changes need to be directly added by you, the integration manager.
The GitHub web interface outlines the steps that allow you to do this. Click on the link for command line instructions, and input the commands into your terminal:
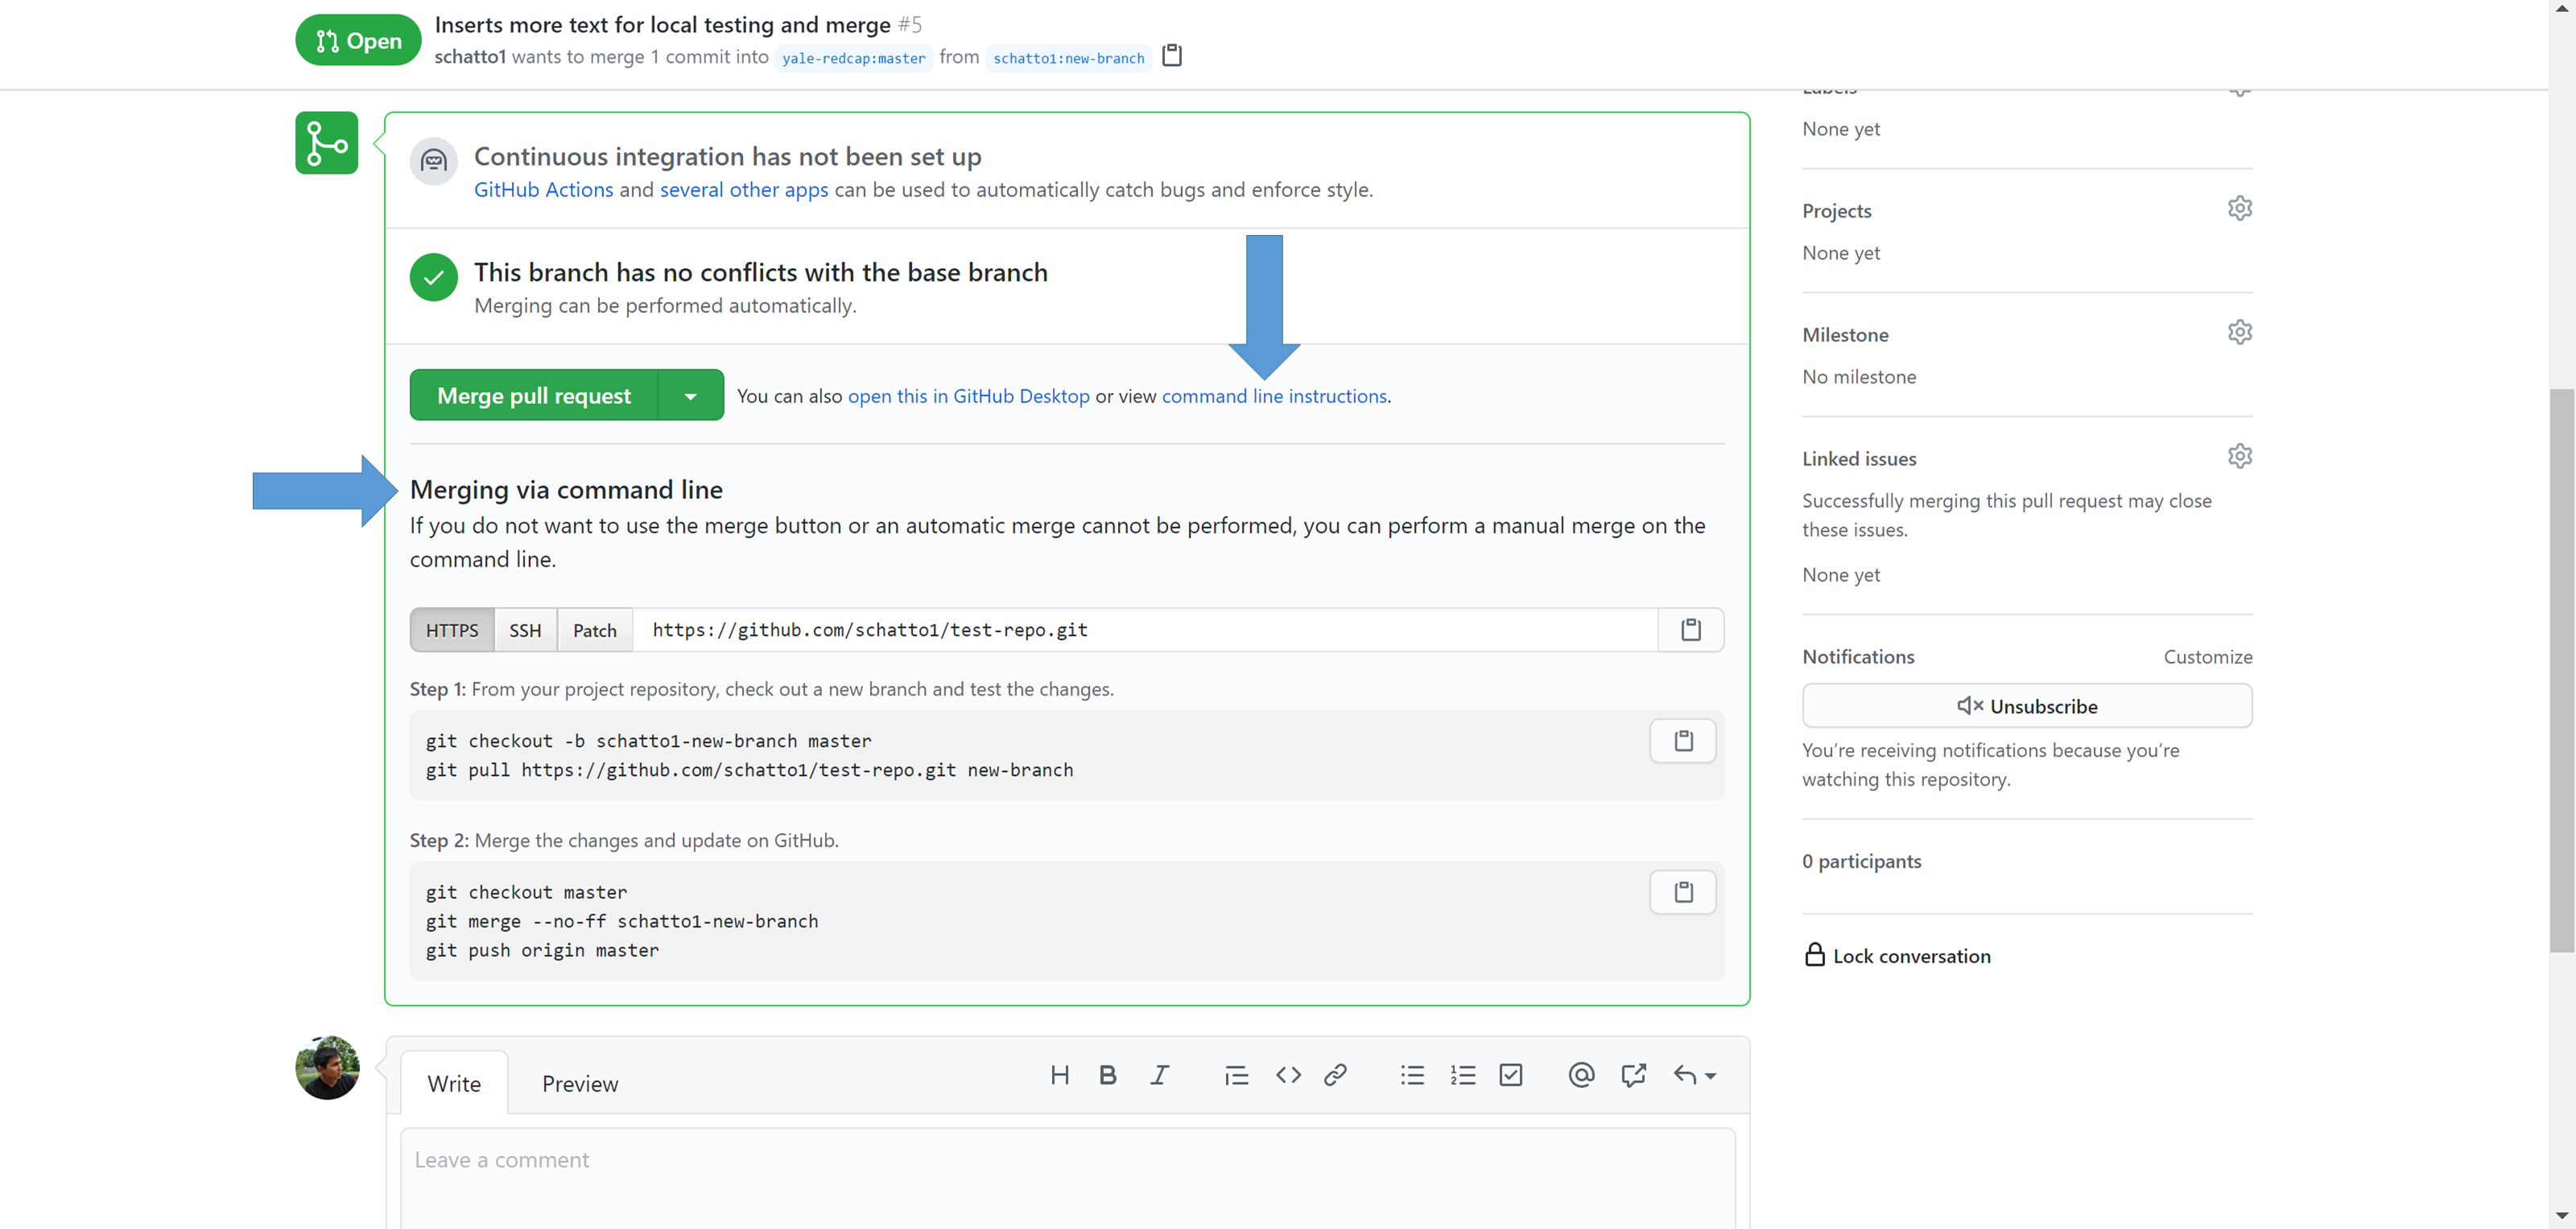
Create the new branch where you will pull the developer's changes:
git checkout -b <developers-GitHub-account>-<branch-name> master
Specifying master here ensures that the branch is created from master.
Then, pull the developer's changes into this new local branch:
git pull https://github.com/<developers-GitHub-account>/test-repo.git <developers-GitHub-account>-<branch-name>
You will now have all of the developer's changes in this branch, and your working directory is modified to reflect this. Go ahead and further test the modifications, or add further changes to the branch.
Once satisfied, checkout the master branch and merge the changes from the new local branch into the master branch:
git checkout master
git merge --no-ff <developers-GitHub-account>-<branch-name>
The --no-ff tag ensures that the merge is treated as a merge, and not simply tacking on the new changes to the HEAD of the master branch.
Once merged locally, push the merge to the central repository:
git push origin master
This assumes that, as the integration manager, you only have access to the central repository and origin points to the central repository.
If you are both a developer and an integration manager for this project, your originpoints to your forked remote repository, and upstream should point to the central repository. In this case, push the merge to the central repository by changing the destination:
git push upstream master
Now, the GitHub web interface should show that the merge was successful and that the pull request was automatically closed:
8. Developers keep their repositories up to date
Now notify the rest of the team of the changes, and proceed to create updated deployments or releases from the central repository. The developers will update their local repositories with the new changes in the central repository. For further details on how to keep forked remote repositories up to date, refer to the workflow guide for the developer.
Conclusion
The three existing repositories (central, remote, and local) provide ample version control and back up capabilities, while also enabling thorough vetting of codebase modifications before deployment and production. Additionally, this workflow lets the developers continue to work while waiting for the project to incorporate their changes, and the integration manager can pull in enhancements and fixes at any time, allowing each party to work at their own pace.
At this point, you should have a good enough understanding of the workflow process to immediately own and maintain a REDCap@Yale software project. Steps 7 and 8 can be repeated for each pull request created by a developer, to continue the development and maintenance of the project.