User Guide
REDCap External Module
Version 1.0.0, August 2022
Introduction
The YES3 Exporter external module compliments REDCap’s reports and data export tool by adding functionality to support integration with statistical software and datamarts.
Features
- Flexible output spreadsheet layouts
- Horizontal (longitudinal design- one row per record, all events), vertical, and repeating form layouts
- Speed - good performance on large exports![image]
- In testing it took 186 seconds to export 3,272 rows and 3,079 columns to a 33MB export csv file
- Optimized for datamart integrations: payload includes data, data dictionary, data distributions, and project metadata
- Data dictionary that includes metadata and data distributions
- Each export is accompanied by a customized data dictionary
- Detailed audit for every export download
- Ability to receive automatic email notifications summarizing export activity
- Audit logs can be easily browsed and downloaded
- Incorporates form-specific user access and export rights
- REDCap v12 user-rights
- Supports deidentified and coded dataset options that mirror the REDCap parent system
- Any number of export templates may be designed and re-used
- Export specifications can be rolled back and restored
- Can write directly to a host filesystem, e.g. to secure mounted institutional file shares
- Light and dark themes
About YES3
Our vision for the Yale Study Support Suite (YES3) is to provide an ‘off-the-shelf’ suite of external modules within REDCap that features popular, high-utility software tools to meet a wide variety of epidemiological and clinical research needs.
Configuration
System Configuration
The YES3 Exporter performs daily tasks, such as removing old export backups and emailing activity reports. By default, daily housekeeping tasks are run at 11 minutes past midnight, but an administrator can specify a different time to run these tasks. The time and results of the most recent daily housekeeping run for all projects are displayed in the YES3 Exporter system configuration page.
To configure, go to Control Panel -> External Modules -> Manage -> Yes3 Exporter ->Configure
Project Configuration
Only users with project design and setup rights can configure the External Module Settings for a project. Project settings include rules for retaining export specification backups, whether and where to send daily email notifications, and settings for host filesystem exports. The date and result of the latest housekeeping run for the project are displayed in the Project Settings.
To configure, go to External Modules -> Manage -> Yes3 Exporter ->Configure
Daily Email Notifications
When enabled, you can designate one email address that will receive a summary of project export activity including: (1.) date and time of report, (2.) REDCap project information, and (3.) details about download and export activity in the last 24 hours. Notifications are released only when exports occur. To disable the daily email notification, you may change the email notification setting to “no” at any time.
Host File System Exports
YES3 Exporter “payloads” can be written to a designated host file system folder (i.e. to mounted secure institutional file shares) which, among other things, is intended to support Datamart integration. To safeguard data security, enabling this setting requires approval by a REDCap administrator.
A payload consists of exported data, a comprehensive data dictionary and an information file having details about the export and project. See the Technical Guide for more information on YES3 Exporter payloads and datamart considerations.
Backup Retention
Export specifications can be rolled back and restored to a prior saved version. By default, 20 generations are retained, but you may choose to retain more or all generations.
YES3 Exporter Overview
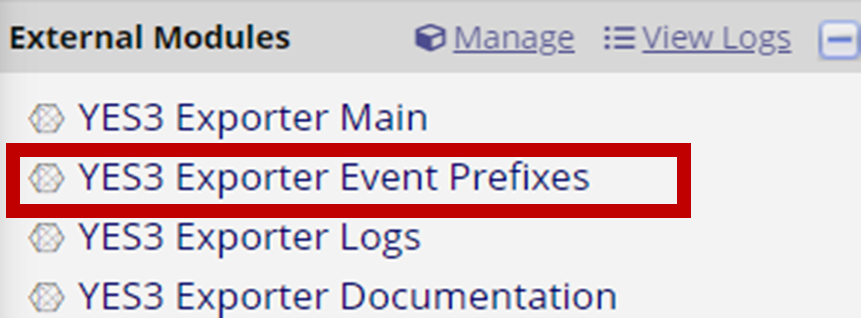
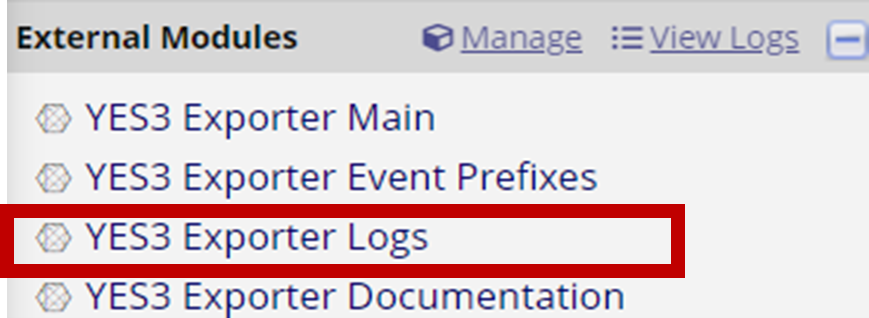
Components
There are four components to the Exporter External Module.
- YES3 Exporter Main
- YES3 Exporter Event Prefixes
- YES3 Exporter Logs
- YES3 Exporter Documentation
User Interface considerations
Device recommendations
Each YES3 Exporter component - like REDCap itself - has a responsive interface, that is it will adapt to various screen geometries from 4k desktops to mobile phones. The Event Prefixes, Export Logs and YES3 Exporter Documentation components all work tolerably well with a portrait-orientation device viewport width of 375 pixels, which covers most mobile phones. However there are practical considerations for the YES3 Exporter Main component, driven by the complexity of the export specification editor. Our target display device for the editor is a standard HD desktop screen (1920x1080 pixels). For an optimal user experience on a desktop, we recommend a minimum screen width, with the browser’s magnification set to 100%, of 1200 pixels. For mobile devices, the minimum viewport dimensions for editing export specifications appear to be 600x600 pixels, which should cover devices ranging from “phablets” to full-size tablets. Most mobile phones will not work for editing, in either portrait or horizontal orientation.
Action icons
YES3 Exporter feaures are accessible through a collection of ‘action icons,’ which are clickable icons displayed in the top-right section of every YES3 Exporter page. For example:
![]()
The YES3 icon at the far right is not technically a YES3 Exporter action icon, rather it is a link that will take you to the YES3 page on our REDCap portal website. There you will find information about the background, goals and plans of the YES3 initiative.
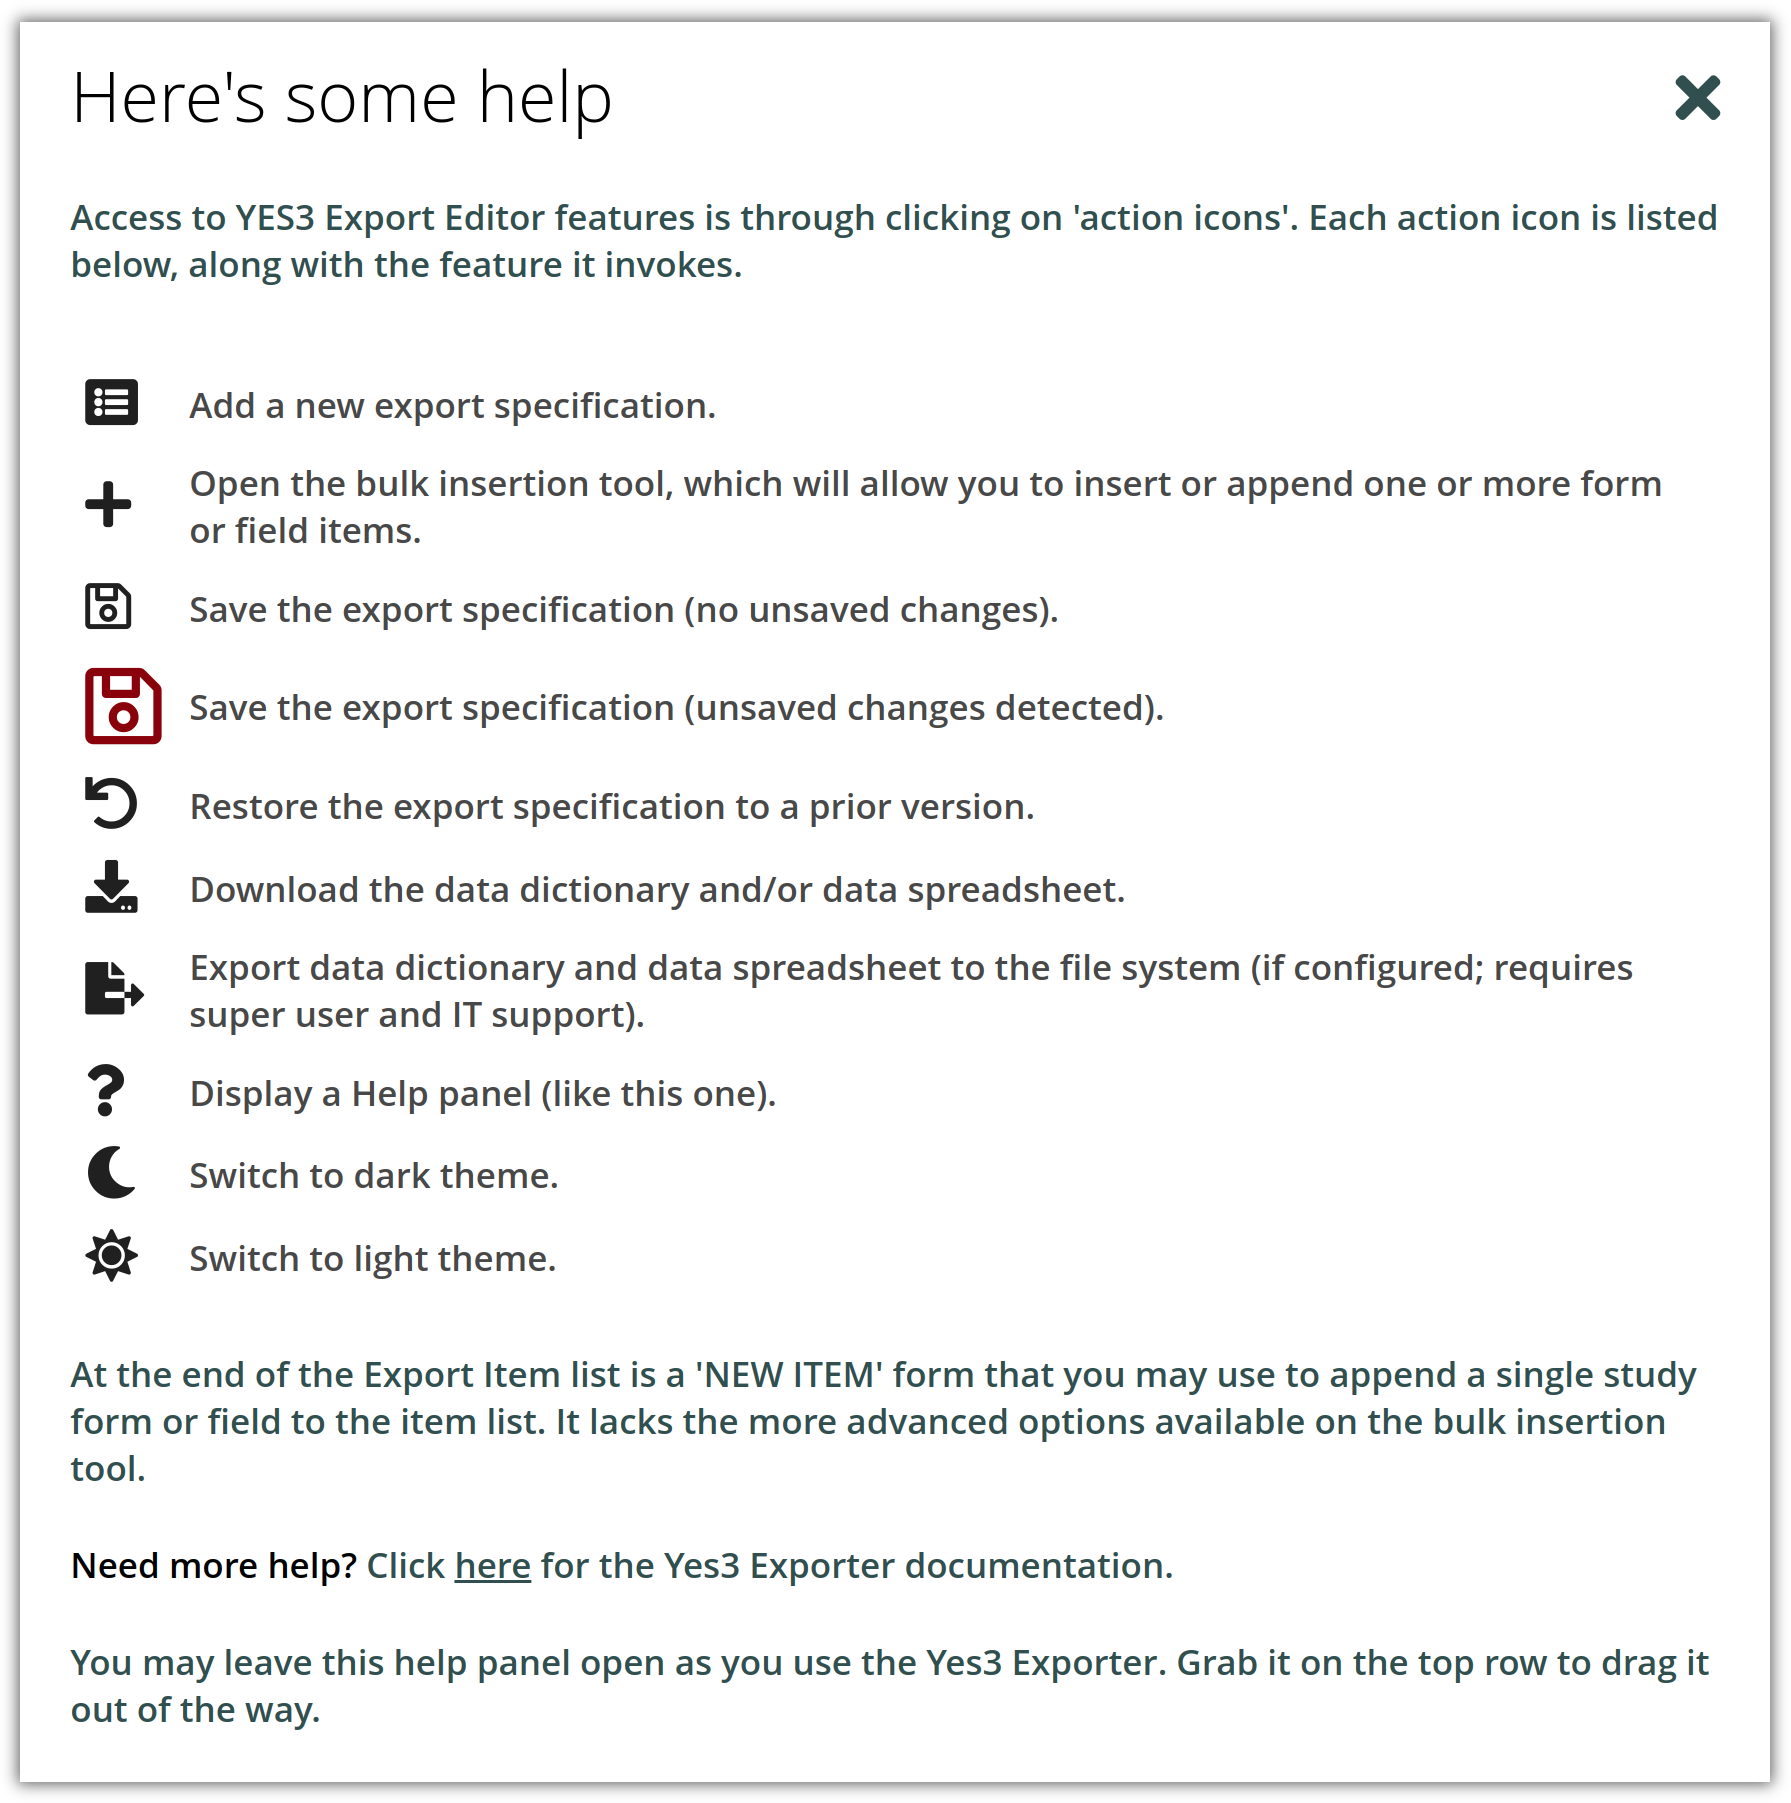
Help panels
Of particular interest is the question-mark action icon: clicking on ? will display a page-specific help panel that will briefly explain all of the available features and their associated action icons. Help panels are overlays that can be repositioned or dragged out of the way as you work.
Here is the help panel for the YES3 Exporter Main (editor) page:
Light and dark themes
You can choose between a light and dark theme, and your choice will persist between sessions and between YES3 Exporter components. Theme selections work though action icons. A crescent moon icon will instantaneously switch to the dark theme, and a sunburst icon will switch to the light theme.
User Rights
Users with project-design rights have the ability to create, modify and download exports. Users without project-design rights and ability to export (e.g., de-identified data) can access what is created; they can view the export and download data. Users with no project-design or data export rights will not see the Exporter module listed on right-hand panel.
Users will not have access to a specific export unless they have both view and export permissions on all items (forms and fields) in the export specification. This protects the data and prevents unblinding.
If a user attempts to access an export with restricted data, they will receive the following message:
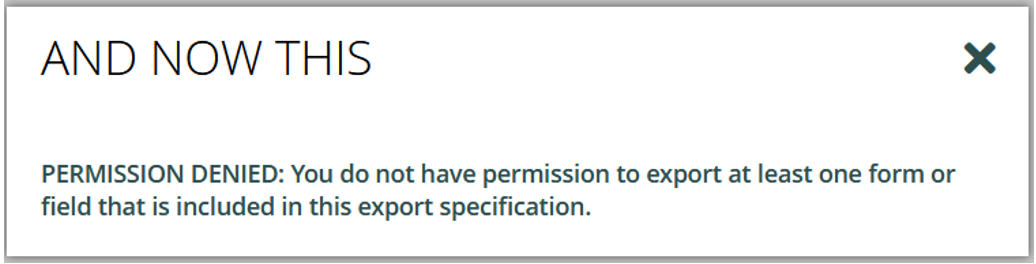
Permission denial is based not only on export rights, but on other user rights such as the right to view PHI.
Getting Started
In this quick start guide, you will (1.) review the prefixes, (2.) create a new export, (3.) configure settings, and (4.) download data.
YES3 Exporter Event Prefixes
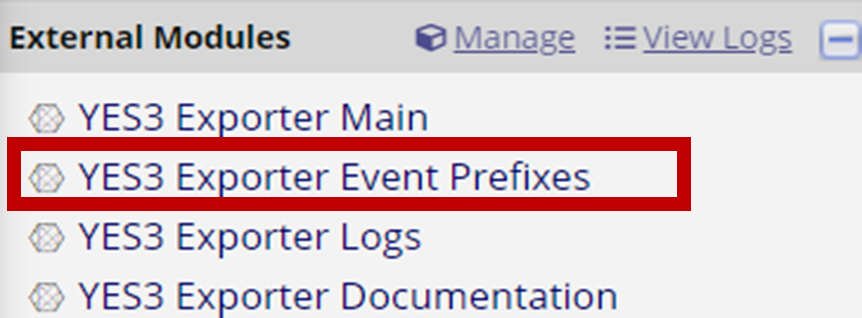
- Before creating your first data export, review the prefix that will be assigned to events with horizontal layouts.
- Access the event list by clicking the ‘YES3 Exporter Event Prefixes’ link under External Modules on the left menu.
- You can edit the pre-generated event prefixes.
- Special characters are permitted but will be removed during exports and downloads.
- Click save after changes are made.
YES3 Exporter Main
Quick Start
-
Click
 button to add a new export.
 -
Enter the export name and select a layout.
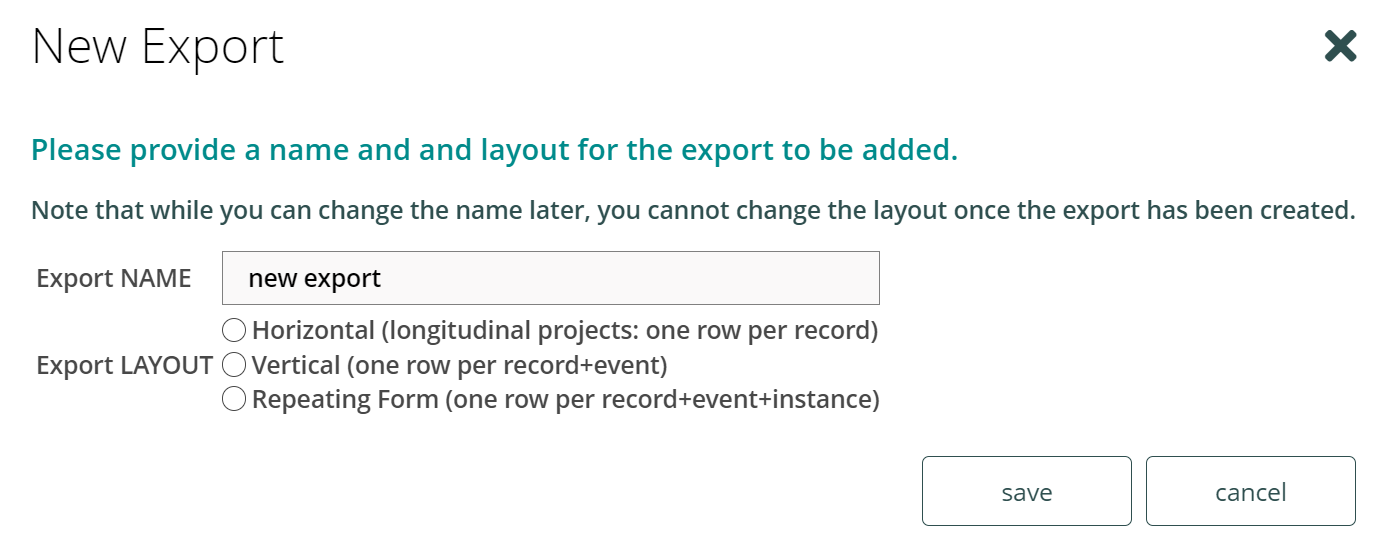
a. Please be mindful of the following limitations when creating a new export:
- Export names cannot be duplicated.
- Special characters are permitted but will be removed during download.
- Create new exports judiciously. Unlike the parent system, you cannot filter, sort, or delete exports in the YES3 Exporter.
-
Once completed, click “Save”.
-
The Export Settings page will be displayed. Here you can customize your export.
-
Once you have selected your options, click
 to save your changes.
 -
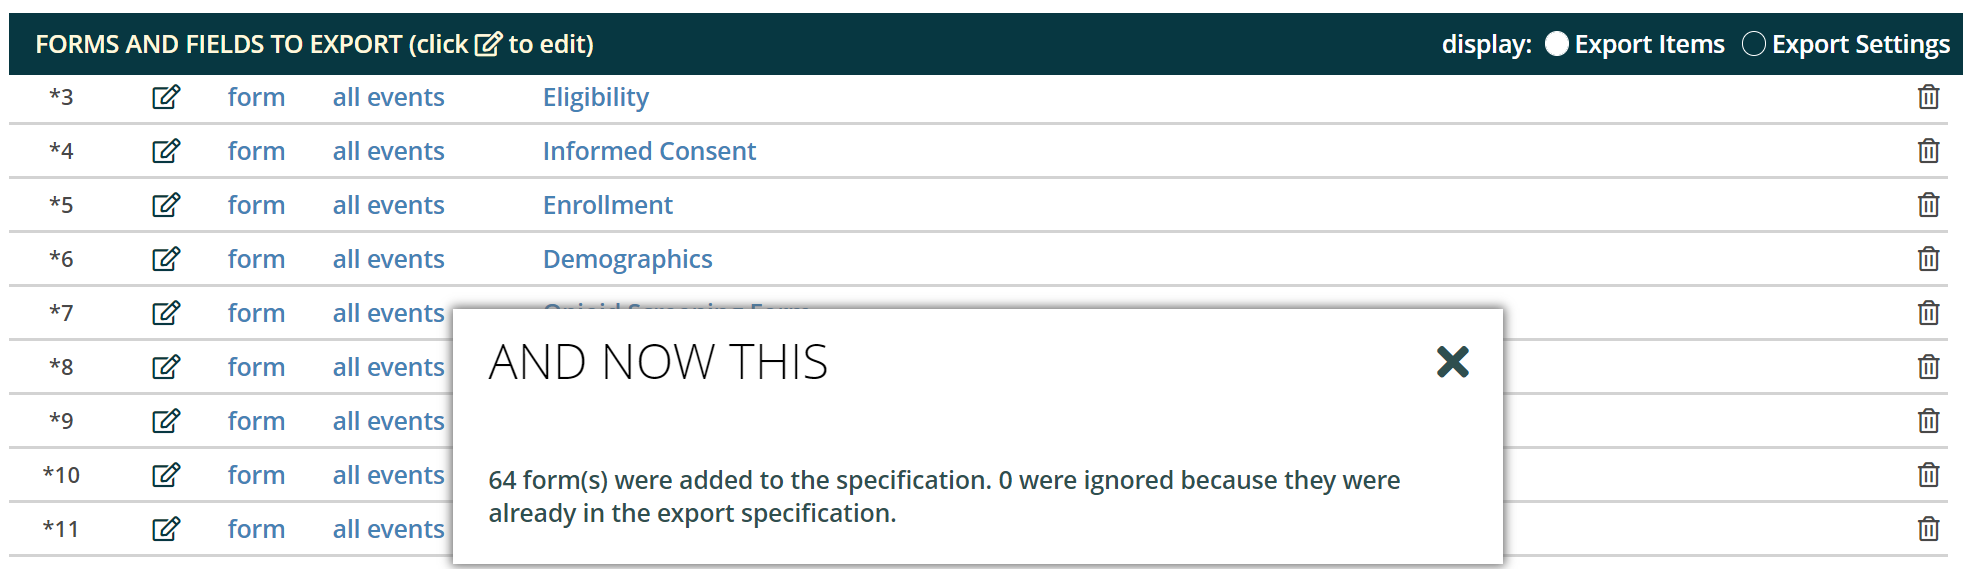
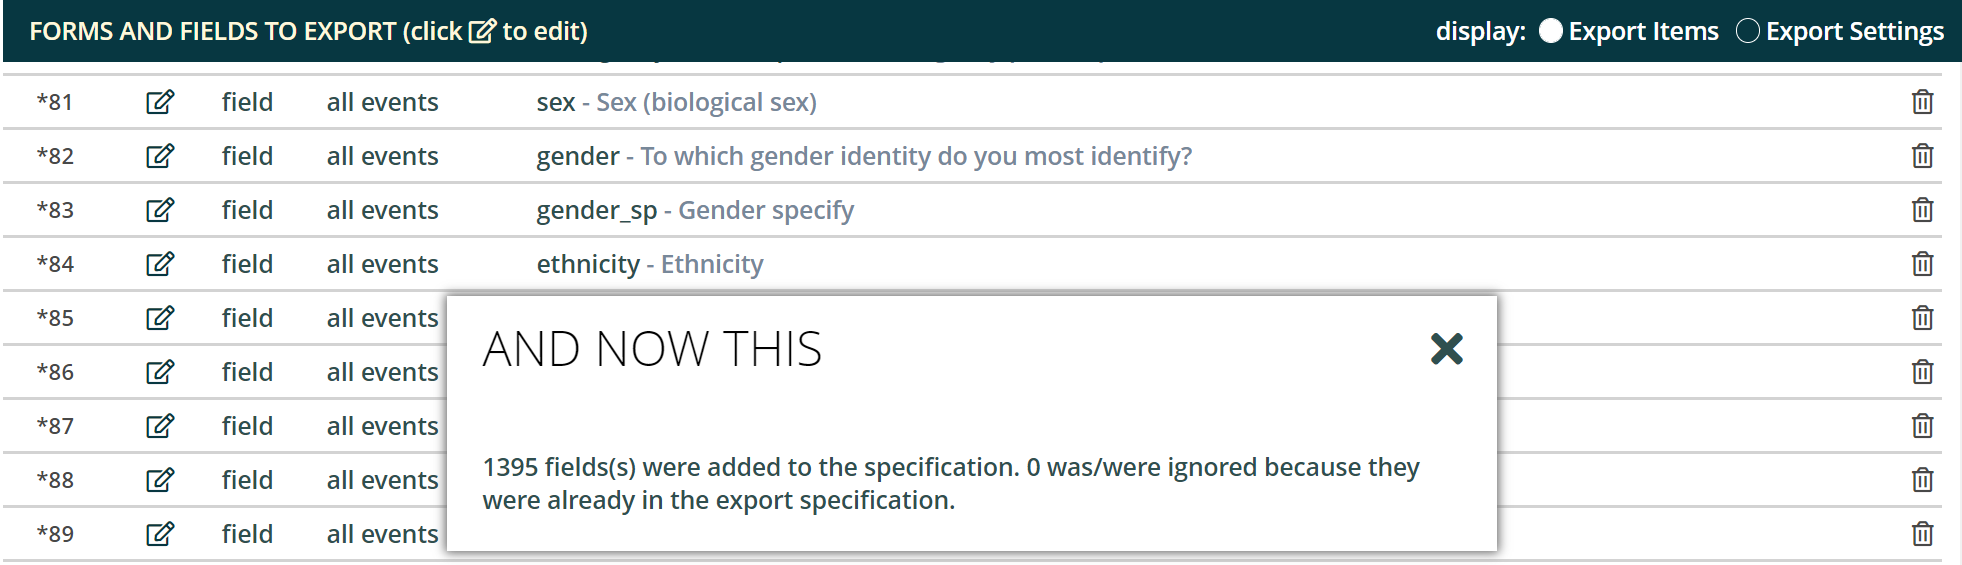
Select ‘Export Items’ in the display setting to add forms/fields.

-
Click the
 button located along the top menu to add forms/fields.
 -
To add forms
a. Select ‘Form’ for object type, then select the event and the form to add to the export.
-
You may choose to insert as single export item which will display as:

-
You may choose to insert as one export item per form which will display as:
-
You may choose to insert as one export item per field which will display as:
b. Once you have chosen your display, click ‘Save’. An asterisk will appear next to each unsaved item.
c. After you have finished adding forms to the export items, save the changes.
-
-
To add fields:
a. Select ‘Field’ for object type, then select the event and type the field name.
-
As you type, the field will auto-populate.
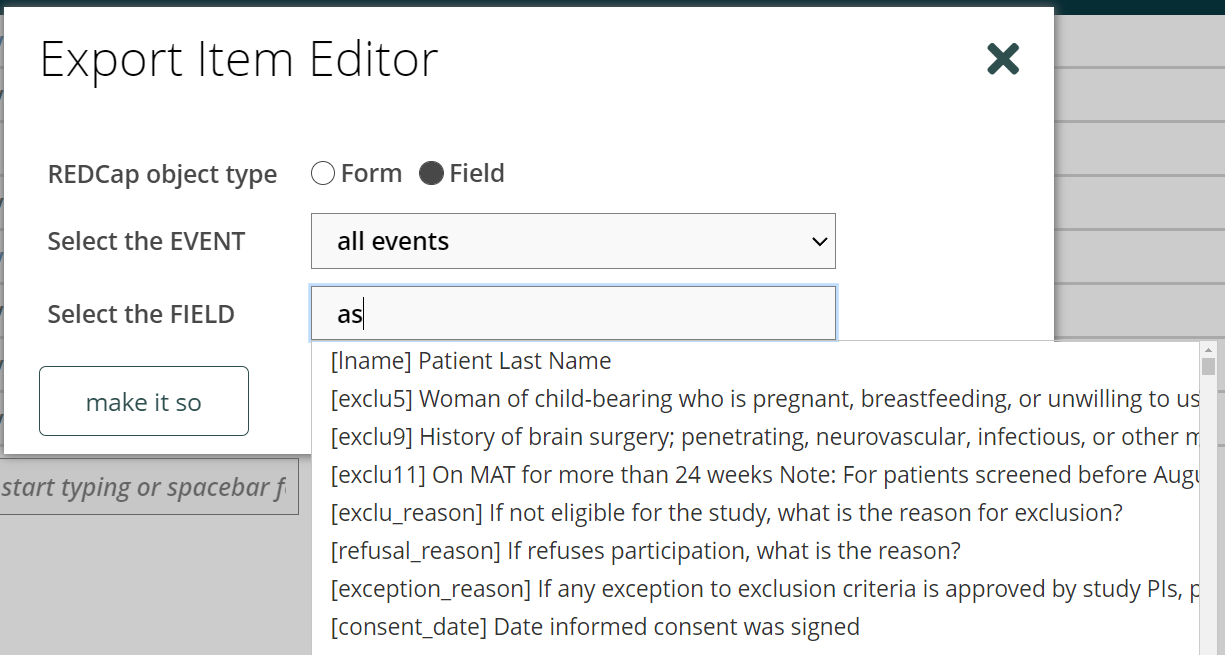
b. Select the field that you would like to add to the export and click ‘Save’.
c. Once you have chosen your display, click ‘Save’. An asterisk will appear next to each unsaved item.
d. After you have finished adding fields to the export items, save the changes.
-
-
Click
 to download the data and/or data dictionary.
Note: For checkbox field, the checked-off options will be combined and export into a single column.
Export Layout
There are three export layouts:
-
Horizontal
-
Longitudinal projects: one row per record
-
The Exporter will automatically add prefixes to field names to differentiate data from distinct events. Prefixes can be changed in YES3 Exporter Event Prefixes.
-
-
Vertical
-
One row per record + event
-
The REDCap event id is included in the data export file.
-
-
Repeating Form
-
One row per record + event + instance
-
Only one repeating form can be defined in the export. In this version, you cannot export repeating events.
-
Export Settings View
On the Export Settings view, you can specify how data is exported across all fields.
Options for Selecting Records
The selecting records option allows you to specify the field, event, and value required for inclusion in the export. This feature uses ONE field to identify the target records.
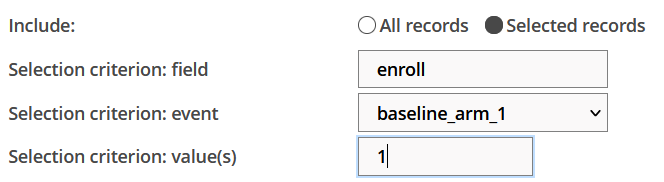
As an example, you may wish to restrict an export to data on those individuals who screened positive on an assessment. To optimize this feature, the target status (e.g. screen positive) must be identified through a query to ONE field in your REDCap project. Additional examples are found in the ? icon.
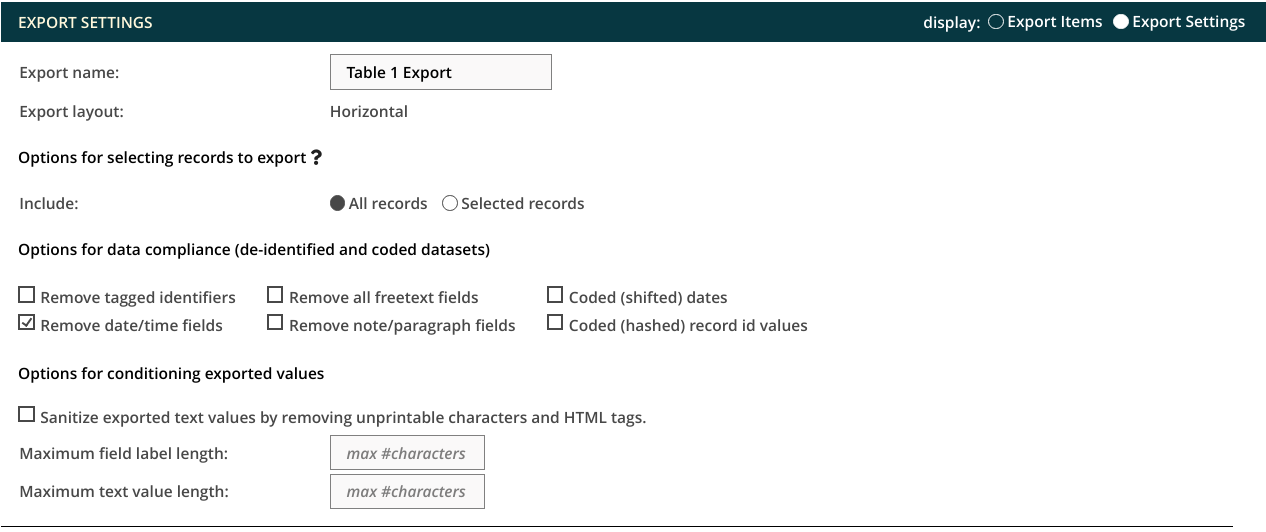
Options for Data Compliance
The data compliance settings replicate the parent REDCap system. Removed fields will not appear in an export. No field label or placeholder will be included in the data export.
Options for Conditioning Exported Values
Sanitize exported text values
This option removes nonprintable characters including tabs, line feeds, html tags, etc. from text fields. International characters will remain intact.
Max character length
You can restrict the number of characters included in the export. Field labels are typically restricted to 200-250 characters to support integration with statistical programs such as SAS.
For text fields, the character restriction is applied to ALL text fields which may result in incomplete data. If you have also opted to Remove all freetext fields, the more restrictive specification will be followed.
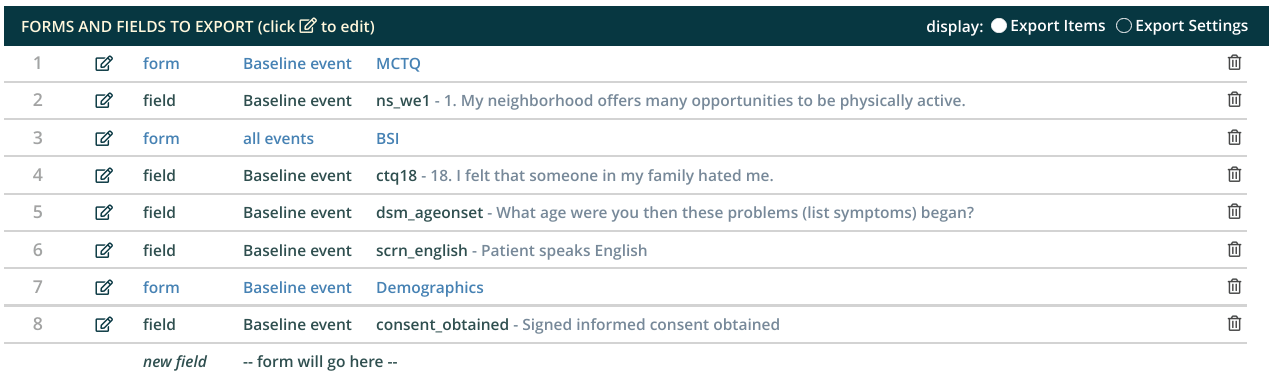
Export Items View
On the Export Items view, you can edit what data will be exported. You can make changes by using the pencil icon to edit an item or the trashcan icon to delete an item. To move an item, hover the cursor on the left side row number until a hand icon appears then drag it up or down to its new location. Remember to save your changes.

Exporter Data Dictionary
Each download or export is accompanied by a data dictionary that includes metadata and export-specific data distribution summaries for each column. These include the count, range, #nonblank, and either a frequency table or mean and variance, as appropriate to the field type (dates are treated as continuous variables).
YES3 Exporter Event Prefixes
The YES3 Exporter Event Prefixes can be accessed from the left menu panel under External Modules. A HELP menu is available by clicking on the ? icon.
Here you can designate event prefixes for horizontal layouts.
[event prefix]_[REDCap field name]
A prefix is a string of characters at the beginning of the field name that is used to designate the ‘event’. Auto-generated prefixes can be edited here. The first character must be alphabetic. There is no restriction on the number of characters, but you should be aware of limitations imposed by statistical software. Special characters will be removed during exports and downloads.
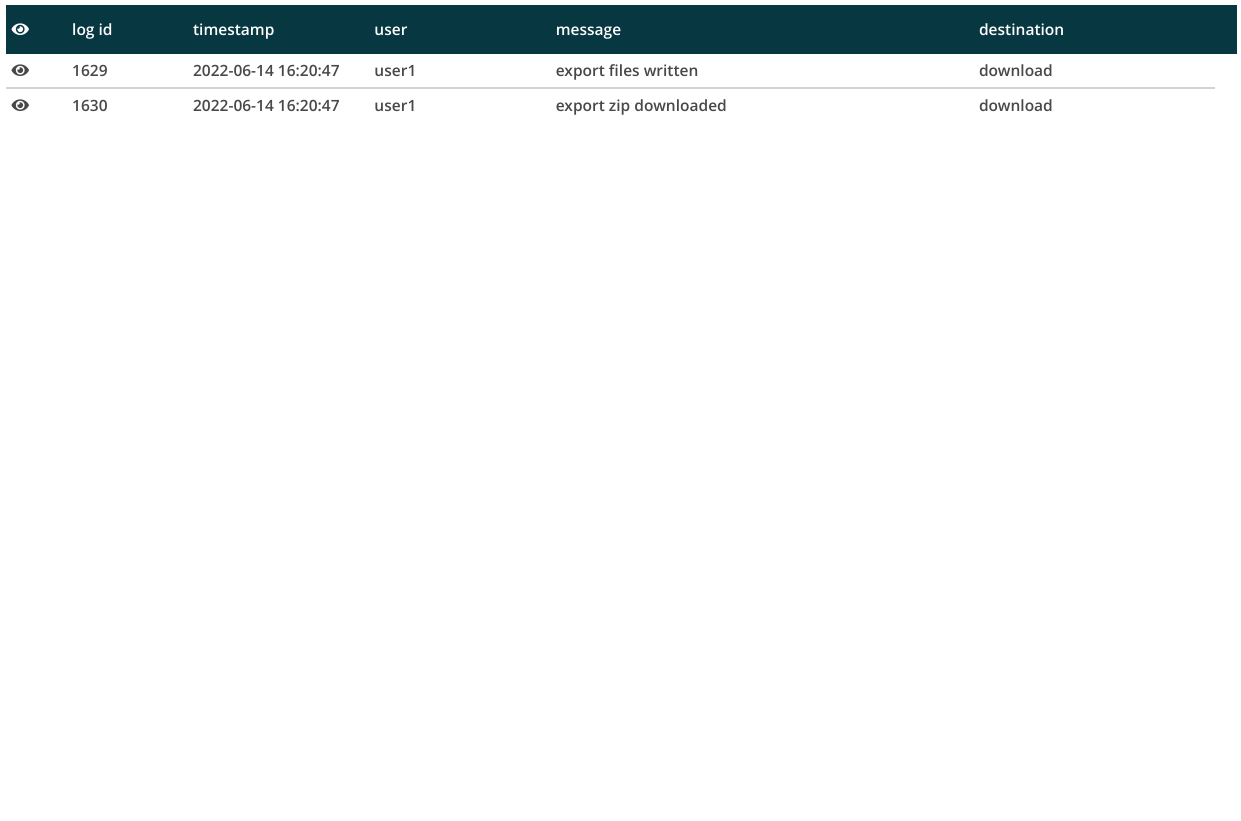
YES3 Exporter Logs
Here you may view and download the logs for each export that has been created. When the data is downloaded or exported, a log is generated which includes information about the export.
To use the exporter
- Access the export log by clicking the ‘YES3 Exporter Logs’ link under External Modules on the left menu.
-
Similar to Exporter Main, a HELP menu is available by clicking on the ? icon.
-
Select an export to view
a. By default, your view will include all export activity. You may filter by user or date range.

-
The log contains information about the exports. Detailed information can be found by clicking on the
 icon.
icon.
 a. You may also click ‘Inspect’ to obtain detailed information about the export settings and variables.
- Click
 to download the log.

CONGRATULATIONS!- YOU MADE IT THROUGH THE USER GUIDE.
Contact
redcap@yale.edu
REDCap@Yale Team:
- Katy Araujo, Yale University
- Venugopal Bhatia, Yale University
- Peter Charpentier, Yale University (retired) and CRI Web Tools LLC
- Brian Funaro, Yale University
- Mary Geda, Yale University
- Janet Miceli, Yale University
- Sui Tsang, Yale University
Funding
- To support our work and ensure future opportunities for development, please acknowledge the software and funding.
- The YES3 Exporter was funded by Yale’s Claude D. Pepper Older Americans Independence Center (OAIC) grant through a Development Project Award for the Operations Core, 3P30AG021342.
License
Copyright © 2024 by Yale University